OK, so my truck didn't burn to the ground - Still . . .

Charging, starting, lighting, gauges, HVAC

Moderators: FORDification, Thunderfoot

Post Reply
68RGR
Preferred User
Preferred User
Posts: 287
Joined: Sat Sep 24, 2011 12:16 pm
Location: Central Alabama

OK, so my truck didn't burn to the ground - Still . . .

Post by 68RGR »

I know this subject has been addressed because I searched the forum for it.

However, my case could offer some insight and, hopefully, some benefit to others.

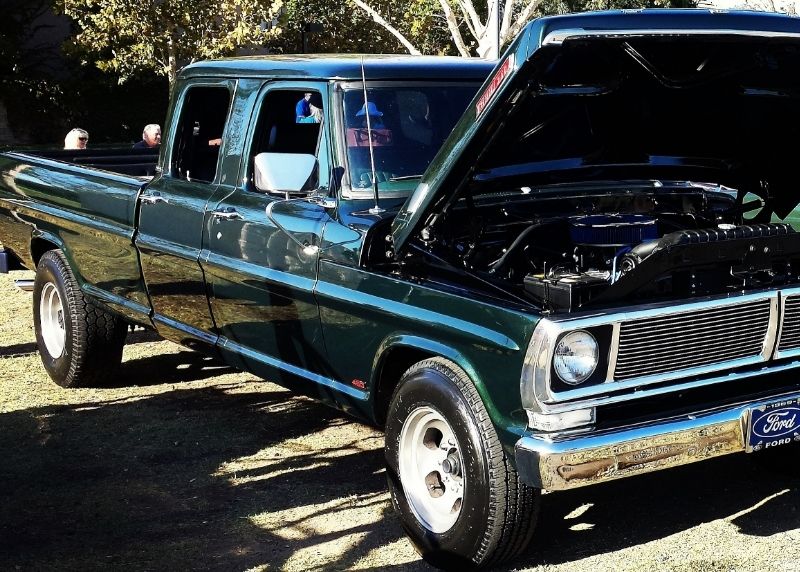
I was working on the parking brake pedal on my '68 Ranger - It was really hard to release. After lubing everything that could possibly impact it, I was wrapping it up by engaging and releasing the parking brake several times.

The last time I released it, I noticed a puff of smoke under the dash, to the right of the release handle. Immediately, I thought, "There's no wiring associated with this . . . ", then, a smoke trail appeared all the way across the underside of the dash. "Uh, there's some wiring associated with SOMETHING and it ain't happy!"

Having experienced a similar problem 40+ years ago while installing an ammeter in a '67 GTO, I knew what to do - Yank a cable off the battery. Fortunately, the cable wasn't as tight as it might have been.

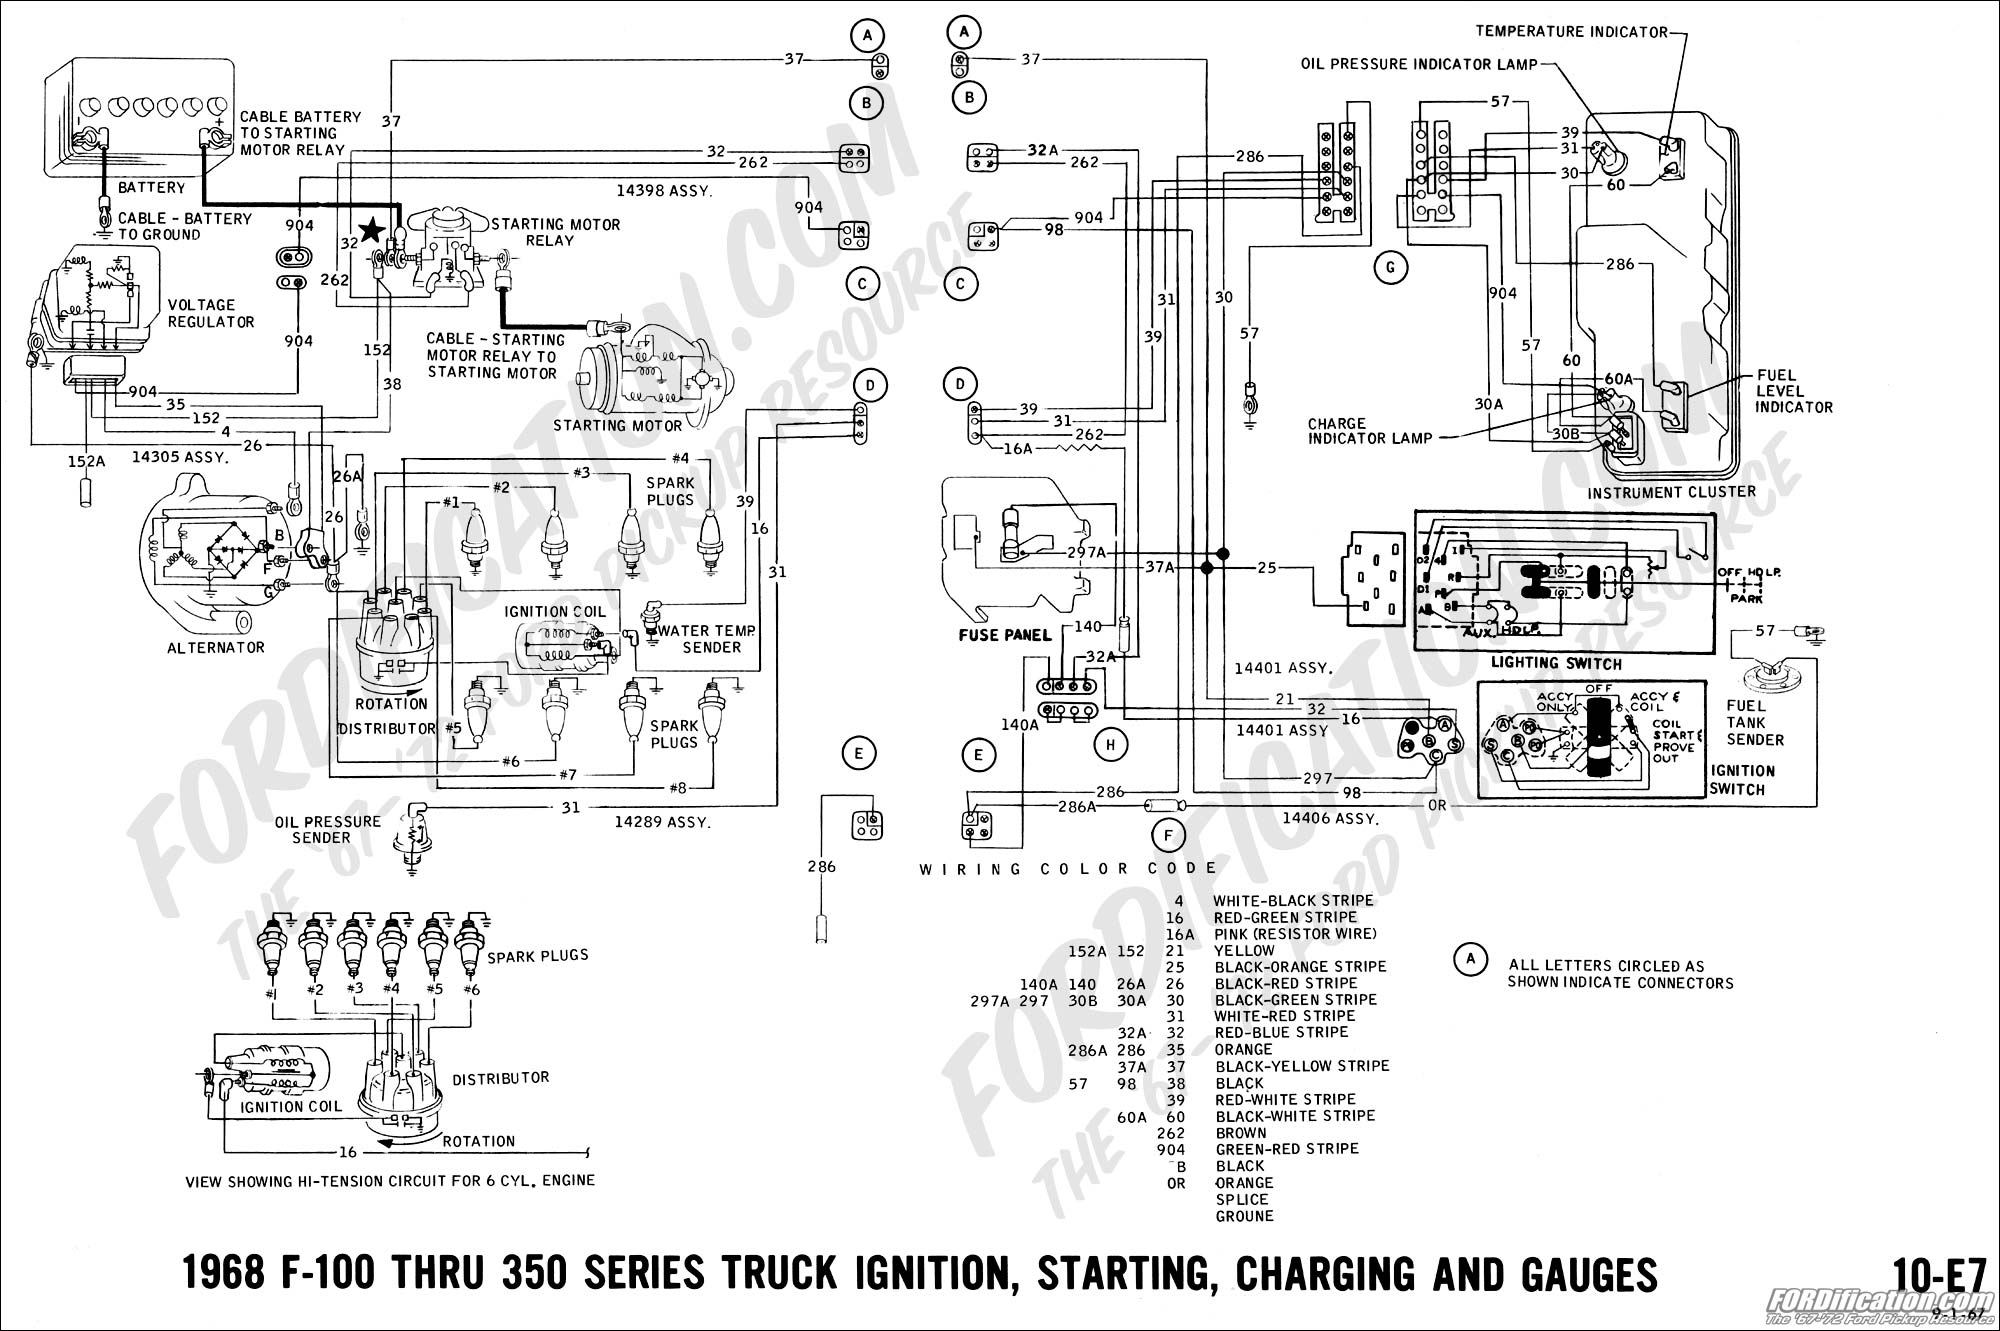
After the smoke cleared. I discovered (the experienced reader already knows) that the ignition switch had separated and, as BAD luck would have it, the center pin had managed to find itself a very suitable ground. So, the yellow wire (and black/yellow wire going back to the battery) was shorted to ground. It was hot to the touch all the way back to the starter solenoid post.

The part of the switch that separated from the housing looked something like this:

Image

Unfortunately, the exact, wrong one of the internal contacts managed to find its way to a ground.

What a revoltin' development.

I was able to check it out a few days later and discovered that the yellow wire ran several inches from the switch and into a rubber covered, factory splice where it connected to the black/yellow and a black/red(?) wire. The insulation on the yellow wire was toast. Many holes, bubbles, etc. I really didn't want to get into that rubber splice so I removed what was left of the yellow insulation, cut the wire a few inches from the switch and sleeved the wire in both directions with some yellow heat shrink tubing that I had in exactly the right size. I used a crimp butt splice to reconnect the wire ends, soldered it just to be sure and used some clear heat shrink tubing over the splice. Then, I re-taped and wrapped the wiring as best I could.

I had already checked the other wires and couldn't find any real damage. That was a relief.

All seems fine now.

HOWEVER . . .

A few weeks ago, the ignition switch acted kinda funny. Didn't seem to be just right. Now, I know why.

If your switch acts up, I'd suggest that you consider replacing it right away. Don't shrug it off.

Also, why the heck is there no protection on the power lead going from the battery (solenoid post) to the ignition switch?

I'm planning to install a circuit breaker on the fender well between the solenoid and firewall. One like this:

https://www.rockauto.com/dbphp/x,catalo ... BC40B.html

And:

http://www.cooperindustries.com/content ... akers.html

These breakers have number 10 studs and a two hole mounting bracket is attached. Just mount the breaker, cut the wire, add crimp connectors to each end and you're done. Seems perfect for this application. And, if it doesn't work out, I can use a number 10 screw and nut to bolt the crimp connectors together. Total cost is under 10 dollars including shipping. If the breaker is part of a larger order, the cost would be under five dollars.

You could use an ATC fuse holder and a 30 or 40 amp fuse. Yes, ATC fuses are available with a 40 amp rating but, I suspect, the ATC fuse holder may not be rated for 40 amps. Even so, the short length of wire involved should be fine. You could go to the Maxi version fuse if this is a concern. You'd still have spade connectors, though. I like the idea of studs and soldered crimp connectors. I think they will hold up better over time.

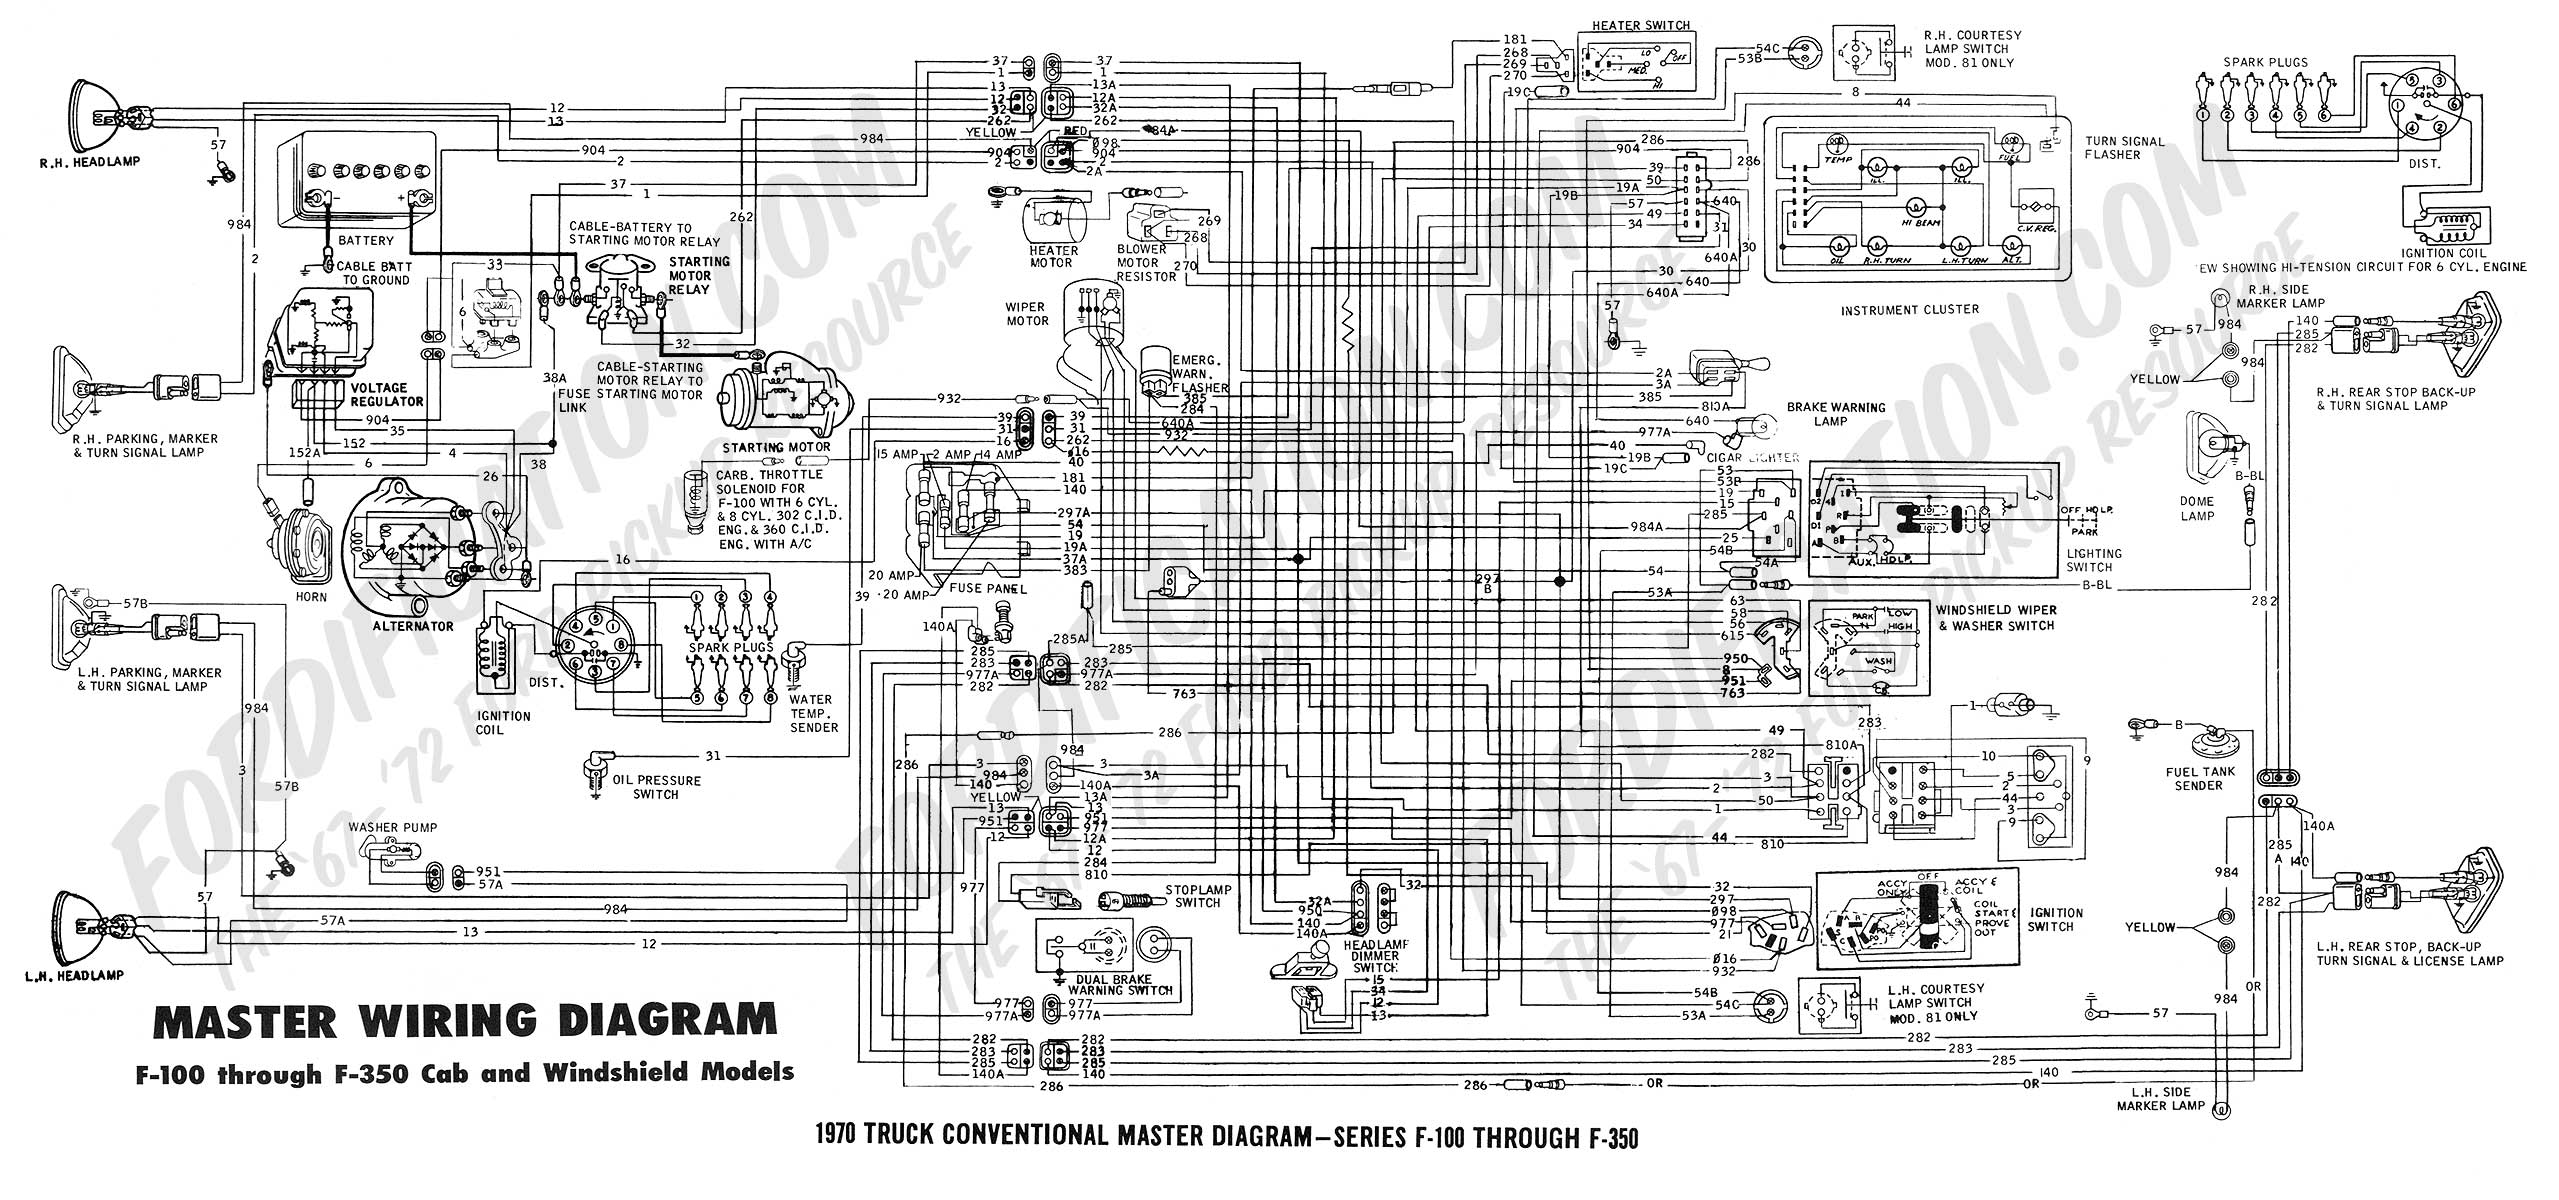
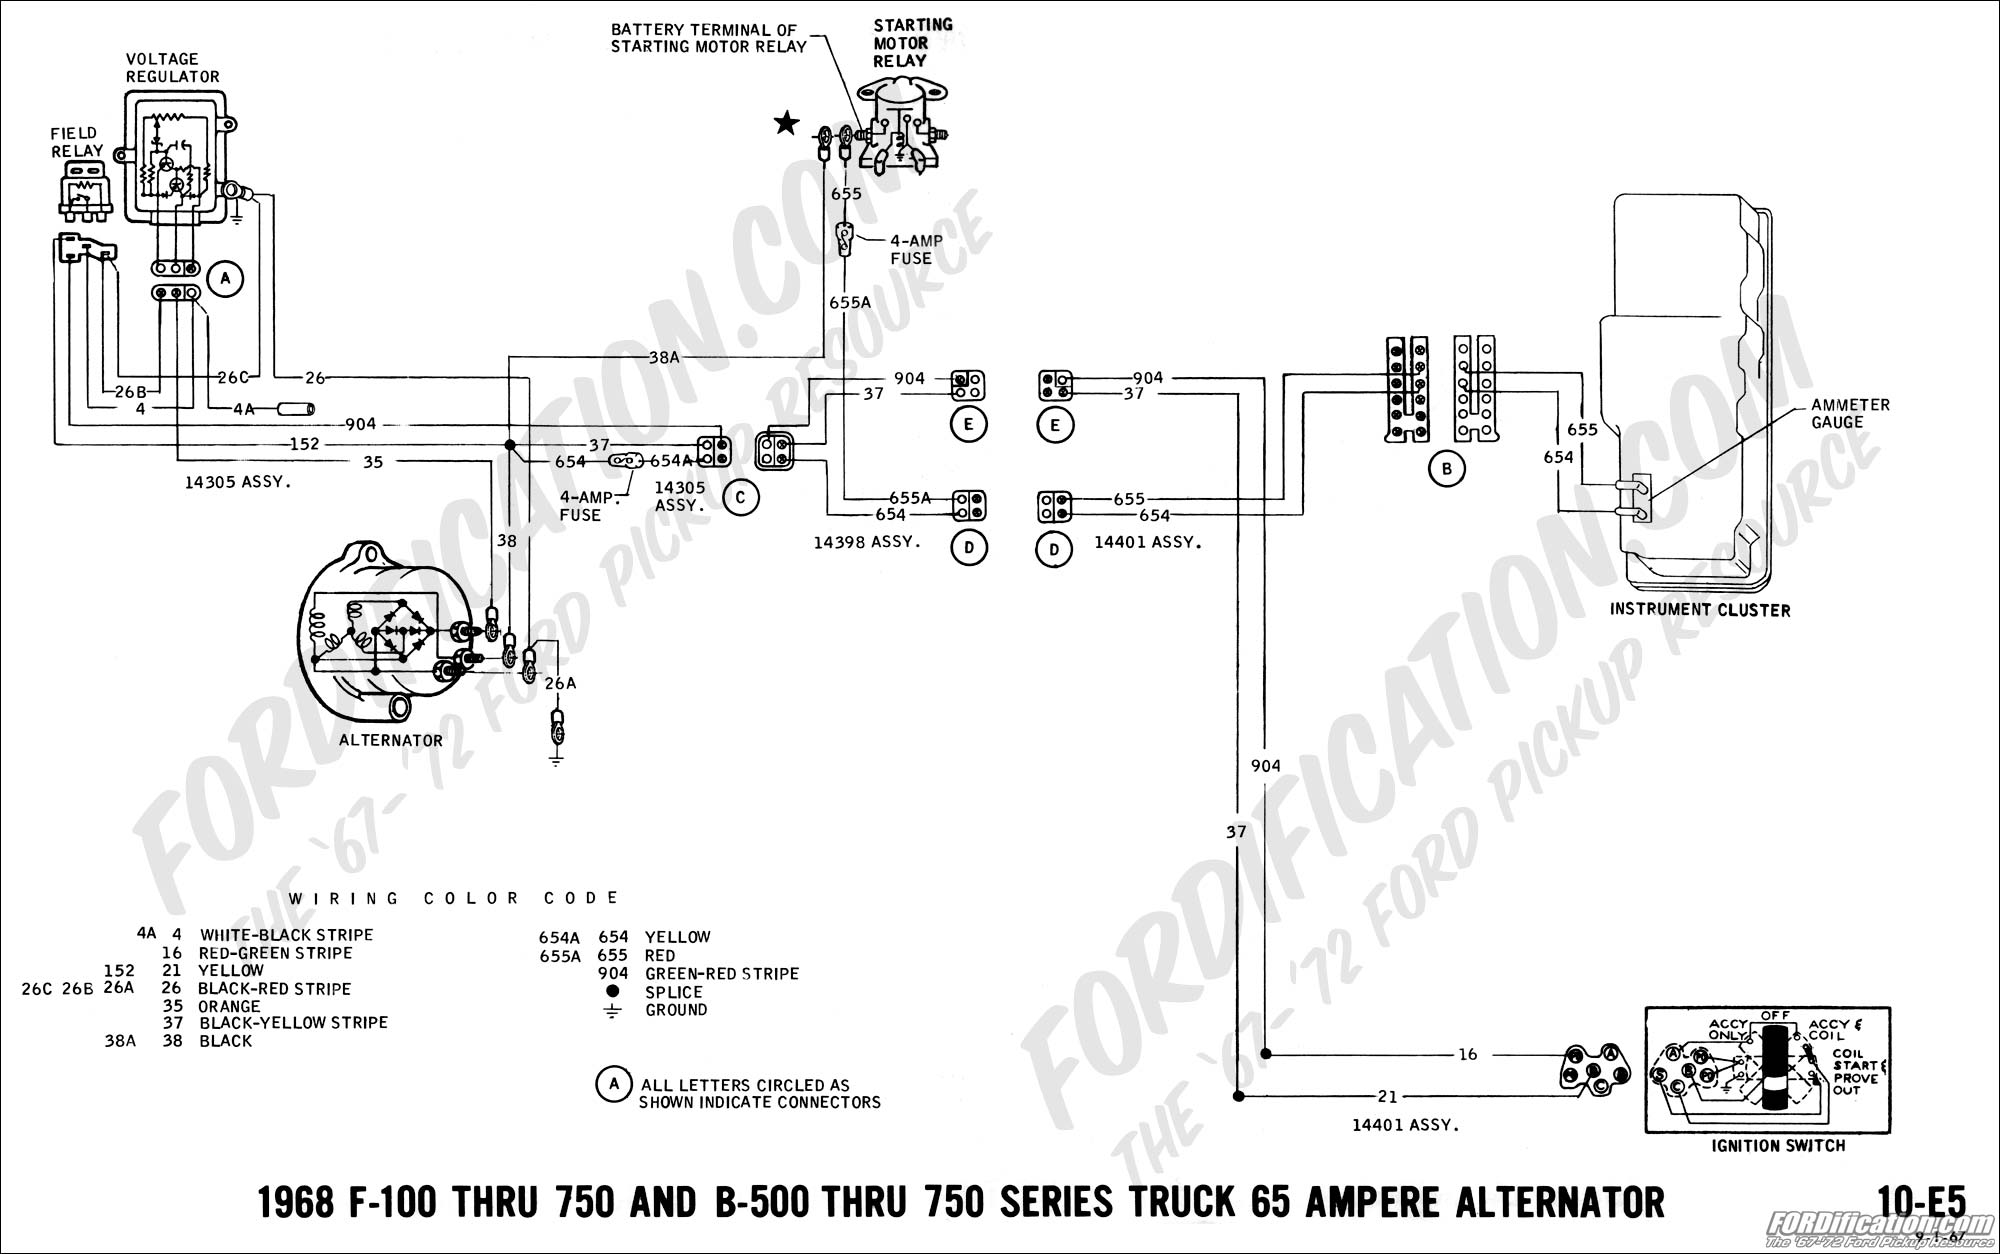
I chose a 40 amp breaker. Hopefully, it is large enough. If not, these are available in a 50 amp version as well. A poster in another thread said this wire carries the charging current to the battery. I don't doubt that. I looked at the wiring diagram and got lost at the voltage regulator. So, I took the other poster's word for it and decided to try a 40 amp breaker. I think the yellow wire is 12 or 14 gauge. So, I'd really like to use a 20 amp breaker but thought it might be too small. I plan to test it by attaching an 8 foot piece of wire to the breaker and shorting the other end to ground to simulate the switch separation event. If the breaker opens, I'll be satisfied. Then, if the breaker remains closed under normal running conditions, I'll be set.

Leaving the wiring as it came from the factory is a fire waiting to happen.

Had I not seen the initial puff of smoke, I could have closed the door and walked away - I was done. I could have lost two trucks and a garage and lots of other stuff. My battery will remain disconnected until the circuit breaker is installed.

The ignition switch is the weak link in this situation. And, all in all, the wiring held up pretty well. But, it would have been pretty much of a non-issue if Ford had added a fuse link or some other form of circuit protection to the hot wire going to the switch.
Bill
68 F100 Ranger
73 F100 Ranger XLT

Believe me, my young friend, there is nothing - absolutely nothing - half so much worth doing as simply messing about in garages. (Apologies to Kenneth Grahame.)
User avatar
sargentrs
100% FORDified!
100% FORDified!
Posts: 9866
Joined: Fri Jun 22, 2007 9:30 am
Location: Georgia, Jasper

Re: OK, so my truck didn't burn to the ground - Still . . .

Post by sargentrs »

Close call! Glad you caught it in time. Thanks for posting that.
Randy
1970 F100 Sport Custom Limited LWB, 302cid, 3 on the tree. NO A/C, NO P/S, NO P/B. Currently in 1000 pcs while rebuilding. Project thread: http://www.fordification.com/forum/view ... 22&t=59995 Plan: 351w, C4, LSD, pwr front disc, p/s, a/c, bucket seats, new interior and paint.
1987 F-150 XLT Lariat, 5.0/C6 auto.
User avatar
Calfdemon
100% FORDified!
100% FORDified!
Posts: 2672
Joined: Tue May 25, 2010 11:31 pm
Location: California, Santa Clarita

Re: OK, so my truck didn't burn to the ground - Still . . .

Post by Calfdemon »

Please update us on the results of your breaker install and let us know exactly what you ended up using and how it works out. Photos of the install would be great too as this is a simple and cheap improvement that a lot of owners can do. I had not thought of this improvement before, but I will now be doing the same thing when I put my crew back together. Thanks for posting this.
-Rich

Current toys -
69 Ford F350 Crew Cab - 460 / C6 - http://i253.photobucket.com/albums/hh67 ... lqgskp.jpg
31 Ford Vicky - 1955 270 Red Ram Hemi / 4 speed - http://i253.photobucket.com/albums/hh67 ... bsibvn.jpg

Former toys -
67 Pontiac Firebird 400 convertible (sold 9/13) - http://i253.photobucket.com/albums/hh67 ... bird-1.jpg
67 Ford Fairlane GT - 390 / 4 speed (sold 7/15) - http://i253.photobucket.com/albums/hh67 ... c5hu8z.jpg
User avatar
Nitekruizer
Blue Oval Fan
Blue Oval Fan
Posts: 545
Joined: Mon Mar 07, 2011 1:43 pm
Location: Manitoba, Canada

Re: OK, so my truck didn't burn to the ground - Still . . .

Post by Nitekruizer »

Glad to hear she didn't burn to the ground. Could you install a 15 (or 20) amp fuse under the dash between the rubber splice and the ignition switch to protect the yellow wire separately? The 40 (or 50) amp breaker is a good idea for protecting the whole circuit. Yes, please let us know how it works out. I think I will be doing this mod now too.
390 FE IN A "BUMP" / 383 WEDGE IN A 2 DOOR C-BODY / 351W IN A FULL-SIZE MERCURY / 194 CHEVY 6 IN A DUECE / 2.4 DOHC CHRYSLER IN A PLASTIC BUBBLE (Driver)
68RGR
Preferred User
Preferred User
Posts: 287
Joined: Sat Sep 24, 2011 12:16 pm
Location: Central Alabama

Re: OK, so my truck didn't burn to the ground - Still . . .

Post by 68RGR »

Nitekruizer wrote:Glad to hear she didn't burn to the ground. Could you install a 15 (or 20) amp fuse under the dash between the rubber splice and the ignition switch to protect the yellow wire separately? The 40 (or 50) amp breaker is a good idea for protecting the whole circuit. Yes, please let us know how it works out. I think I will be doing this mod now too.
Based on the way I understand the circuit, I believe the circuit breaker on the fender well is the way to go. It would be "cleaner" (Not to mention easier - Being in or under a dash isn't all that comfortable for me) and would protect the whole smear. At this point, I'm just happy that it appears only the yellow wire was damaged.

Back in the 70s, I had this little foreign sedan. It had been repaired on the right front. The factory didn't believe in chassis grounds for lights. So, they ran both a hot wire and ground to the lights. When the fender was reassembled, the body guy reversed the wires to the side marker light. First time the lights were turned on, the hot wire burned from the switch all the way to the side marker light. That damaged numerous wires along the way. I suppose no one thought (or knew) to turn the switch off or to disconnect the battery! Had to be smoke-city in that thing for a few minutes!

That was before I bought it. It had all sorts of odd problems - Like intermittents, weird light issues, etc. I had to replace the main harness all the way across the dash. TWENTY-TWO wires! I used a cable from a trunk-mounted mobile radio and only made one mistake - Swapped a white-orange and an orange-white wire at one end of the cable. I'll never forget that one. Once that was corrected, all was OK.

It took a few hours of soldering and taping to do it but it worked. I still use the wire from those radio cables. Used some last week as a matter of fact.

The truck wasn't nearly as bad - At least, I don't think so given what I've seen so far. Even so, I'll be a little bit on the skittish side for a while!

I'll try to take some photos of the circuit breaker and post the results here.
Bill
68 F100 Ranger
73 F100 Ranger XLT

Believe me, my young friend, there is nothing - absolutely nothing - half so much worth doing as simply messing about in garages. (Apologies to Kenneth Grahame.)
User avatar
papabug71
100% FORDified!
100% FORDified!
Posts: 2002
Joined: Mon Oct 13, 2008 11:31 pm
Location: McAlester, Oklahoma

Re: OK, so my truck didn't burn to the ground - Still . . .

Post by papabug71 »

Glad you caught it in time. Could have been bad!

Please do post up a how-to. This should be one of those mods every owner should do :2cents:
Image
Matt
1971 F-100 Sport Custom - My grandpaws truck
Been in the family since 10/3/'71 (Brand spankin' new)
Mine since 5/7/'94
302 / 3 speed / 3:25's
--Currently undergoing full frame off resto/mod--
68RGR
Preferred User
Preferred User
Posts: 287
Joined: Sat Sep 24, 2011 12:16 pm
Location: Central Alabama

Re: OK, so my truck didn't burn to the ground - Still . . .

Post by 68RGR »

Hold on to your breakers guys.

After digging deeper into the wiring diagrams, I find that this diagram - http://www.fordification.com/tech/wiring/68-09.jpg - Is the most accurate for my truck which is a '68 F100 Ranger.

The diagram I checked when the switch came apart is only a partial diagram for the alternator circuit - http://www.fordification.com/tech/wiring/68-07.jpg

As such, it leaves out a whole bunch of stuff. So much, that when I unwrapped the harness between the solenoid and firewall along the right front fender, I was surprised at what I saw. Previously, based on the 68-07 diagram, I didn't expect to see the black wire with the yellow stripe (37) connected directly to the positive terminal on the solenoid. I thought it was routed as shown in the 68-07 drawing but it is not.

It turns out that the black/yellow wire carries the juice for virtually the entire truck. It feeds the ignition switch (21), the fuse panel (37A) and the headlight switch through a black wire with an orange stripe (25). It appears to be considerably larger than the yellow wire (21) that splices into it and feeds the ignition switch. That is probably why the black/yellow wire(37) wasn't scorched like the yellow wire (21) was.

The point is, a 40 amp circuit breaker may not be large enough. I have a clamp on meter and I am going to try to measure the current in the black yellow wire with everything possible turned on.

If anyone has any additional info on the current flowing in this wire, please post it.

More to come.
Bill
68 F100 Ranger
73 F100 Ranger XLT

Believe me, my young friend, there is nothing - absolutely nothing - half so much worth doing as simply messing about in garages. (Apologies to Kenneth Grahame.)
68RGR
Preferred User
Preferred User
Posts: 287
Joined: Sat Sep 24, 2011 12:16 pm
Location: Central Alabama

Re: OK, so my truck didn't burn to the ground - Still . . .

Post by 68RGR »

Here's the update some of you asked for.

I used an inline analog meter with a 15 amp rating to measure the current draw from the battery.

With the headlights on high beam and the brake and dome lights on, I measured 13.5 amps. Then, with the heater on high and the switch on (truck not running), I measured 11 amps. That's a total of 24.5 amps. With the truck running, I'm guessing the total might have been as much as 35 amps.

So, I decided to bite the bullet and I cut the black/yellow wire. It is a nice, hefty wire. May even be 10 gauge. My 10-12 gauge ring terminals had very little slack when I tried them on the wire. Anyhow, I wired up the 40 amp circuit breaker and started the truck. No problems during my brief test with the headlights on high, heater fan on high, brake lights and ignition switch on.

I'll be doing further testing but, given that the breaker didn't trip during the few minutes I was checking it, I am thinking this just might work fine. And, if the 40 amp breaker isn't larger enough, I'll use the 50 amp version of the same style.

I haven't mounted the breaker yet but the photo below shows the breaker along with the wiring.

To install the breaker, I started unwrapping the harness at the point where the three or four wires exit the wrap near the solenoid. I unwrapped it toward the firewall far enough to expose about a foot of the yellow/black wire. Then, I cut the wire, installed the ring terminals and re-wrapped the bundle using the original wrapper. All that was left was to connect the breaker.
Breaker and Wiring Unmounted.jpg
Breaker Close Up Smaller.jpg

The portion of my ignition switch that decided it was time to move on is shown below. Note the discolored center pin. I believe it darkened due to heating during the short circuit.
Ignition Switch Connector Side1 Smaller.jpg
The center contact managed to find a ground under the dash when the switch came apart.

If you decide to do this, please post your results here.
You do not have the required permissions to view the files attached to this post.
Bill
68 F100 Ranger
73 F100 Ranger XLT

Believe me, my young friend, there is nothing - absolutely nothing - half so much worth doing as simply messing about in garages. (Apologies to Kenneth Grahame.)
72BahamaBlue
Blue Oval Fan
Blue Oval Fan
Posts: 663
Joined: Sat Aug 20, 2011 3:05 am
Location: Seattle Washington

Re: OK, so my truck didn't burn to the ground - Still . . .

Post by 72BahamaBlue »

Wasn't there a TSB for those earlier style switches?
I seem to remember the replacements came with a connector and pigtail to adapt to the newer style switch.
68RGR
Preferred User
Preferred User
Posts: 287
Joined: Sat Sep 24, 2011 12:16 pm
Location: Central Alabama

Re: OK, so my truck didn't burn to the ground - Still . . .

Post by 68RGR »

I've looked at both styles of the switch. There may be some differences that are an improvement but the only obvious difference I recall was the older switch used a connector with round pins and the newer one used a connector with flat (spade-like) terminals.

You are correct that Ford furnished the new switch and pigtail as a replacement. But, I had assumed that was just a retrofit to keep them from having to stock two styles of the same (functionally) switch.

Anyone have more definitive info?
Bill
68 F100 Ranger
73 F100 Ranger XLT

Believe me, my young friend, there is nothing - absolutely nothing - half so much worth doing as simply messing about in garages. (Apologies to Kenneth Grahame.)
fordman
100% FORDified!
100% FORDified!
Posts: 22329
Joined: Sun Aug 28, 2005 8:17 pm
Location: Kansas, Ottawa
Contact:

Re: OK, so my truck didn't burn to the ground - Still . . .

Post by fordman »

not too sure abou tthe tsb deal on those bullet type of switches. they newer switches were upgraded in 69 or so i think. you can i think get a new connector for the bullet type switches. i think. either that or you can get the blade type plugsd. check lmc back pages for switches. it shows a connector that can be bought and used for the ignition switch.
User avatar
kf7mjf
Preferred User
Preferred User
Posts: 354
Joined: Mon Mar 26, 2012 7:29 pm
Location: Olympia, WA

Re: OK, so my truck didn't burn to the ground - Still . . .

Post by kf7mjf »

Good thread. One more thing I've added to my to do list. Thanks for posting.
1967 F-100 Ranger
mrollings53
Blue Oval Fan
Blue Oval Fan
Posts: 617
Joined: Mon May 10, 2010 6:09 pm
Location: Tacoma, WA

Re: OK, so my truck didn't burn to the ground - Still . . .

Post by mrollings53 »

Napa sells the pigtail for the '70 and up ignition switch. '69 came with the bullet style switch; at least they did when my truck was assembled in December of '68. When I did all of the wiring for my rebuild I swapped the bullet style switch for the spade connector to make it easier to fix the wiring. Some PO did a hack job on the original wiring, and I had to wire in a new ignition circuit for my electronic ignition.
Common Sense is an Uncommon Virtue
yellercat
New Member
New Member
Posts: 85
Joined: Tue Oct 15, 2019 1:59 pm
Location: Arkansas

Re: OK, so my truck didn't burn to the ground - Still . . .

Post by yellercat »

Looking to replace the circuit breaker on my 69' Camper Special.
Can someone give the original amperage for this model with the 390FE engine and automatic transmission ( if there are differences for engine/trans )?
thanks in advance
1970 F100 302 C-4 factory air
User avatar
basketcase0302
100% FORDified!
100% FORDified!
Posts: 6805
Joined: Thu Jan 26, 2006 7:11 am
Location: Hawthorne, Florida

Re: OK, so my truck didn't burn to the ground - Still . . .

Post by basketcase0302 »

="yellercat" Looking to replace the circuit breaker on my 69' Camper Special.
Can someone give the original amperage for this model with the 390FE engine and automatic transmission ( if there are differences for engine/trans )?
thanks in advance
Here's the 1970 truck master wiring diagram, (I was unaware there was a circuit breaker in the wiring other than maybe the camper special cab light wiring)? I'm pretty sure that all the trucks then used a fusible link to limit the amperage. :hmm:

Image
Jeff
http://www.fordification.com/forum/view ... 22&t=46251
SOLD-71 F-350 dually flatbed, 302 / .030 over V-8 with a "baby"C-6, B & M truckshifter, Dana70/4.11 ratio, intermittent wipers, tilt steering, full LED lighting on the flat bed, and no stereo yet (this way I can hear the rattles to diagnose)! SOLD!
Many Ford bumps / one 76' EB / and several dents through the years.
A lot of "oddball" Ford parts collected from working on them for 34 years now!
2008 Ford Escape 4 x 4
Post Reply