PaPa's 69 F100 Explorer Coyote 10R80 swap
Moderator: FORDification
-
hfdco4

- Blue Oval Guru

- Posts: 1289
- Joined: Mon Apr 01, 2013 1:45 pm
Re: PaPa's 69 F100 Explorer
Wow, love it so far. Good luck for moving forward.
Paul
 FE390PC
1970 F250 4x4
2016 F150 4x4 2.7 ECO
Gone 1997, 1999 & 2003 F150 4x4s
Gone 1988, 1989 & 1991 Broncs
1970 F250 4x4
2016 F150 4x4 2.7 ECO
Gone 1997, 1999 & 2003 F150 4x4s
Gone 1988, 1989 & 1991 Broncs
-
Venomous duck

- Preferred User

- Posts: 268
- Joined: Fri Jun 22, 2018 6:39 am
- Location: Norman, Oklahoma
- Contact:
Re: PaPa's 69 F100 Explorer
Thanks, Having some fitment issues. I am hoping I can get it worked out this weekend. Then I will post some progress.
-
Venomous duck
- Preferred User
- Posts: 268
- Joined: Fri Jun 22, 2018 6:39 am
- Location: Norman, Oklahoma
- Contact:
Re: PaPa's 69 F100 Explorer
Installing the engine came with some challenges. The instructions say to line up the indicated hole with the hole in the engine mount using a screwdriver and parallel with the groove in the frame. Once the driver mount bracket is installed loosely on the frame then you install the passenger side mount bracket on the the engine mount then lower the engine into place. Then mark and drill out the frame on the passenger side. The location of the mount should be 1 inch below the U shaped slot on the frame On the passenger side side the mount should be 3/4 inch down from the U shaped slot and 1 inch behind the front of the crossmember.
You do not have the required permissions to view the files attached to this post.
Last edited by Venomous duck on Wed Feb 08, 2023 7:48 pm, edited 1 time in total.
-
Venomous duck
- Preferred User
- Posts: 268
- Joined: Fri Jun 22, 2018 6:39 am
- Location: Norman, Oklahoma
- Contact:
Re: PaPa's 69 F100 Explorer
I then dropped the engine in. The passenger side bracket has a gap of about a 1/4 inch between it and the frame. I also noticed that the bracket is about 4 inches behind the front of the crossmember.
You do not have the required permissions to view the files attached to this post.
-
Venomous duck
- Preferred User
- Posts: 268
- Joined: Fri Jun 22, 2018 6:39 am
- Location: Norman, Oklahoma
- Contact:
Re: PaPa's 69 F100 Explorer
At this point I went out to my parts truck, (the 75) and started measuring. Having a parts truck available is very handy. This crossmember looks just like the pictures in the FFG instructions. I took lots of measurements from multiple points. I marked out were the U shaped slots would be if they were on my frame. The 69 frame measures 3/8 of an inch narrower between the shock towers than the 75. This may just be differences in tolerance on the assembly line. I also noticed the frame on the 75 is narrower front to rear by 3 inches. I am assuming that after 69 Ford made some changes. Probably in 71 or 72. Mine is a very late 69. After marking out where the U slots are I discovered he driver side bracket right at 1 inch below the slot. The passenger side is about 3/8 of an inch.
You do not have the required permissions to view the files attached to this post.
Last edited by Venomous duck on Tue Feb 07, 2023 11:09 pm, edited 1 time in total.
-
Venomous duck
- Preferred User
- Posts: 268
- Joined: Fri Jun 22, 2018 6:39 am
- Location: Norman, Oklahoma
- Contact:
Re: PaPa's 69 F100 Explorer
Next I slotted the driver side mount bracket holes.
You do not have the required permissions to view the files attached to this post.
-
Venomous duck
- Preferred User
- Posts: 268
- Joined: Fri Jun 22, 2018 6:39 am
- Location: Norman, Oklahoma
- Contact:
Re: PaPa's 69 F100 Explorer
Still not enough so back out and in. It took 2 more times of R&R and grinding before I was satisfied with the fitment.
You do not have the required permissions to view the files attached to this post.
Last edited by Venomous duck on Wed Feb 08, 2023 7:52 pm, edited 1 time in total.
-
Venomous duck
- Preferred User
- Posts: 268
- Joined: Fri Jun 22, 2018 6:39 am
- Location: Norman, Oklahoma
- Contact:
Re: PaPa's 69 F100 Explorer
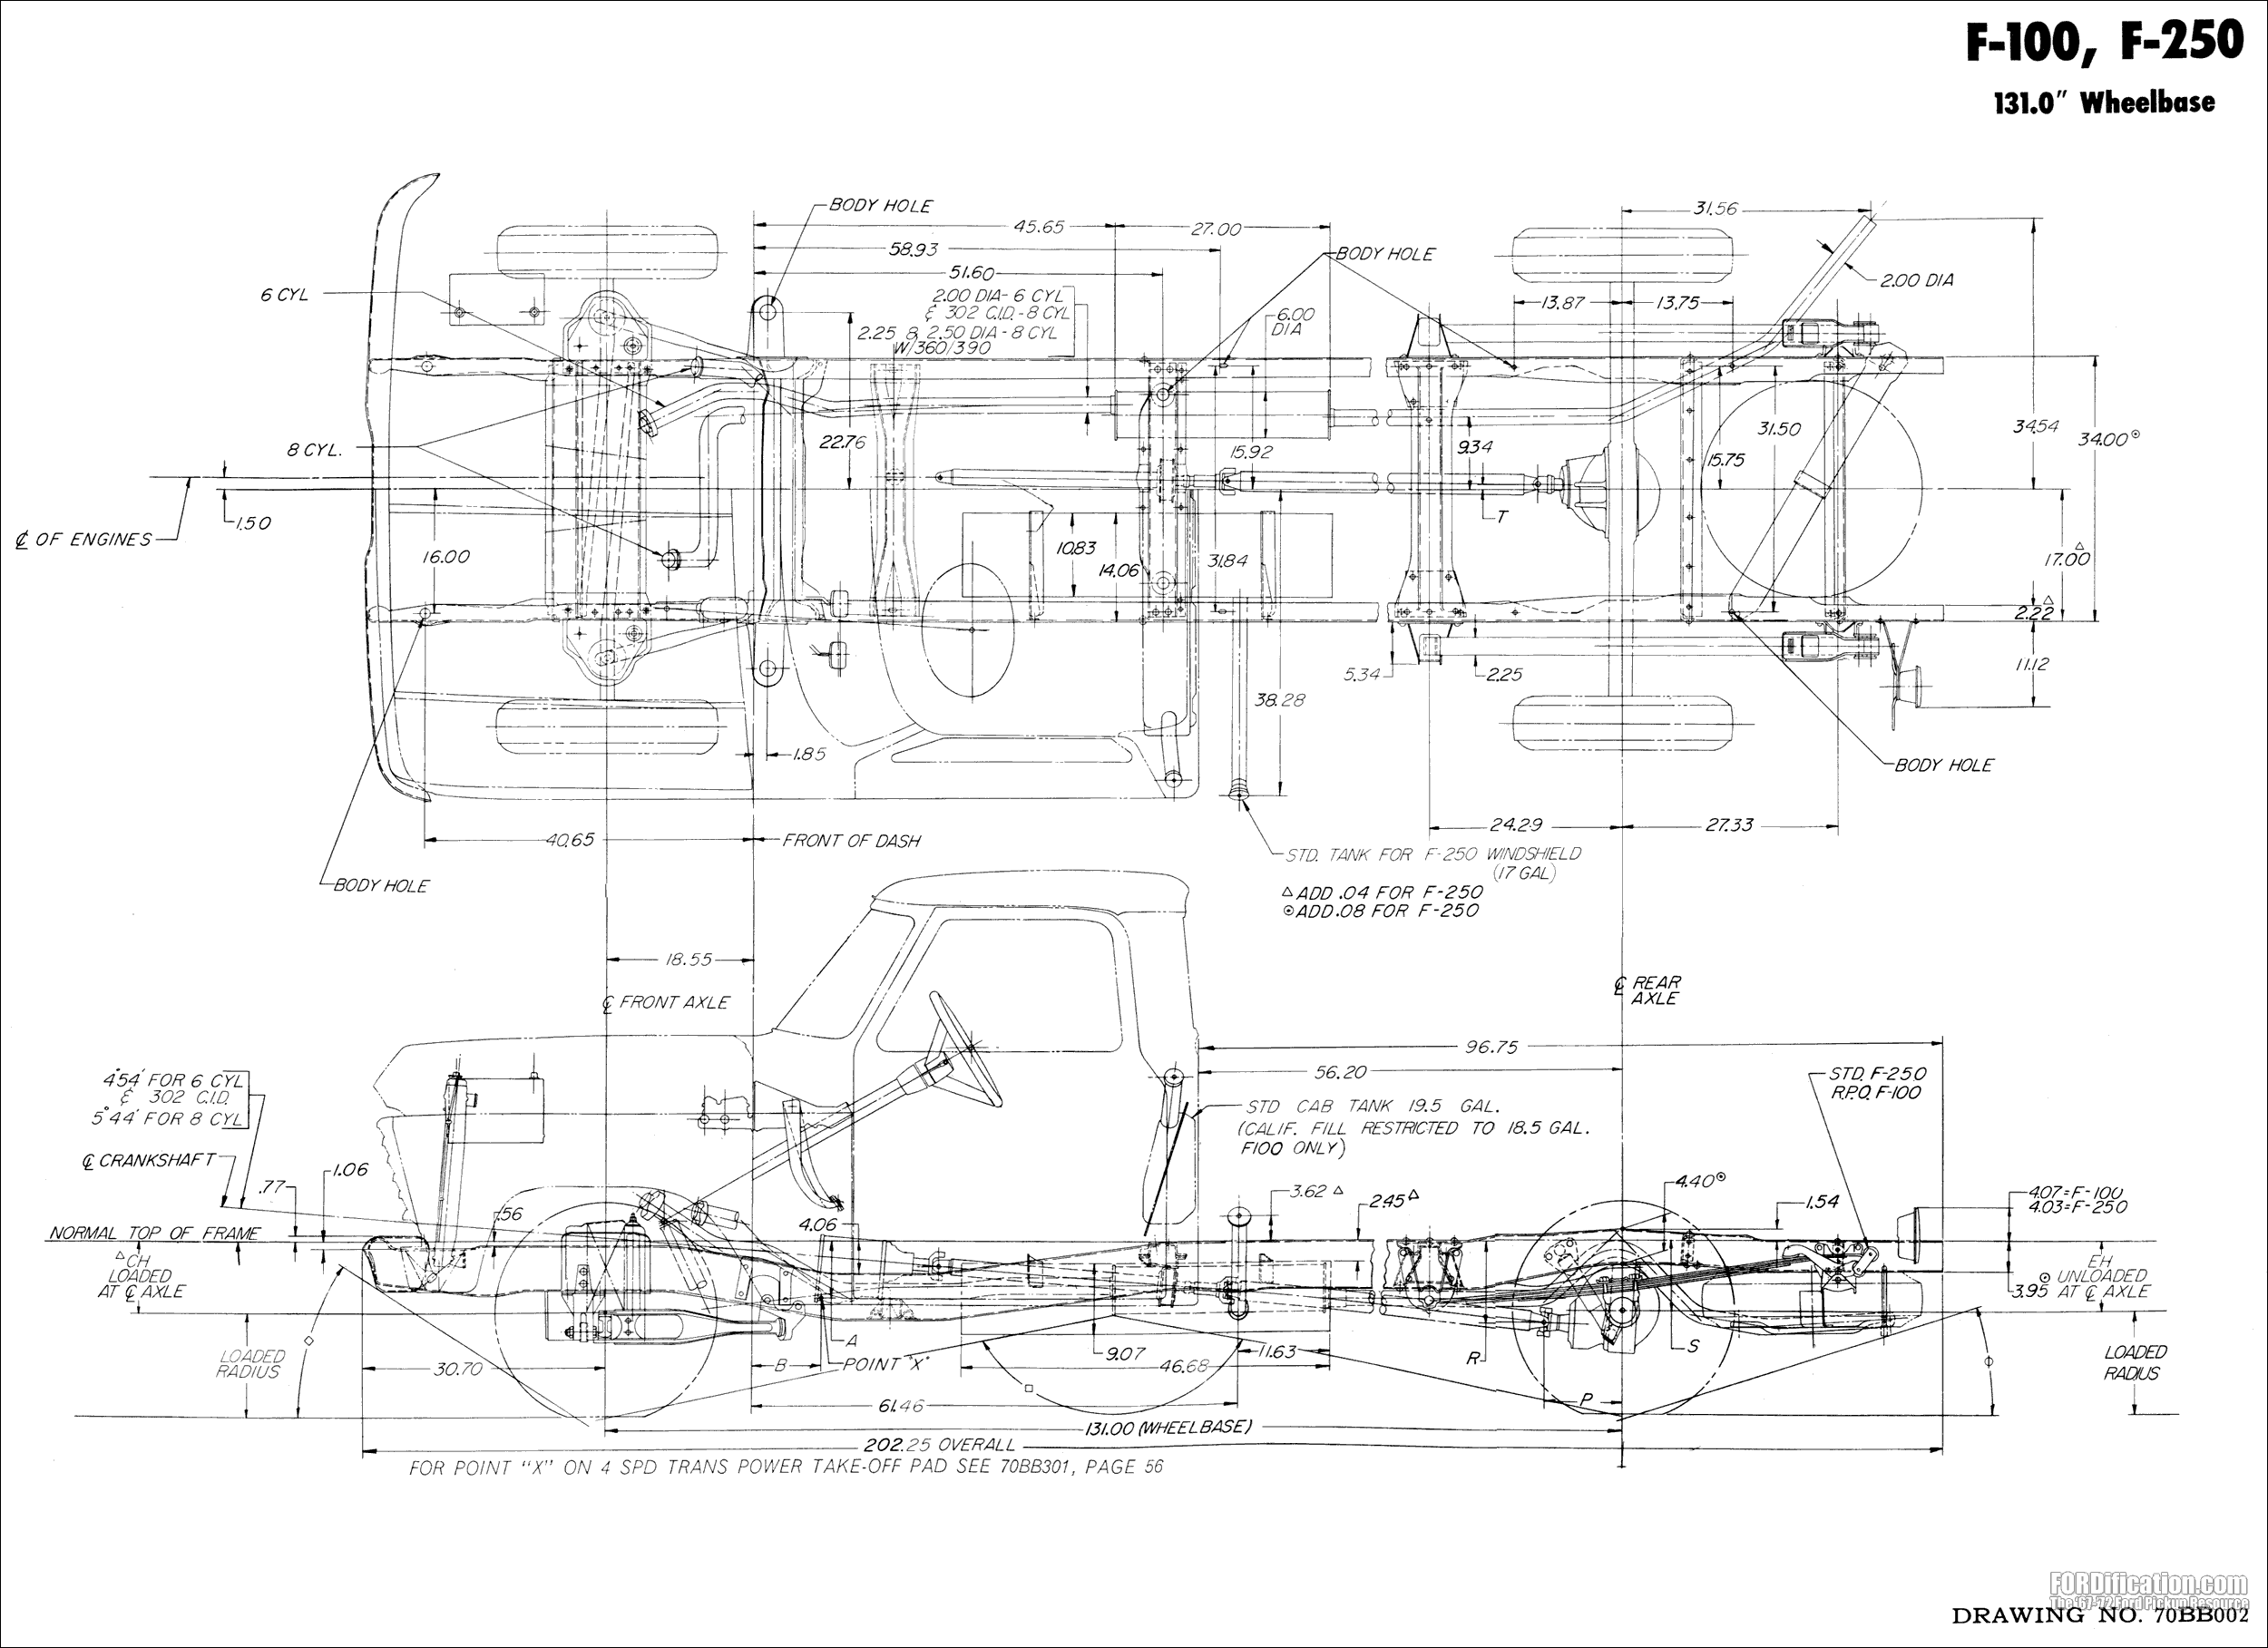
Next I had to make sure the engine and trans is sitting parallel with the frame and a straight shot to the rear axle. The body builders layout book came in very handy. It can be found here. http://www.fordification.com/tech/images/bb70/p08.gif
You do not have the required permissions to view the files attached to this post.
-
Venomous duck
- Preferred User
- Posts: 268
- Joined: Fri Jun 22, 2018 6:39 am
- Location: Norman, Oklahoma
- Contact:
Re: PaPa's 69 F100 Explorer
Next the holes were marked on the passenger side. Then engine was removed again, holes drilled, engine put back in then the trans crossmember installed. It looks like the transmission will have to be shimmed up a little to get the driveline angle setup. That will have to wait for a while.
You do not have the required permissions to view the files attached to this post.
-
DuckRyder

- Moderator

- Posts: 4893
- Joined: Mon Jul 19, 2004 3:04 pm
- Location: Scruffy City
- Contact:
Re: PaPa's 69 F100 Explorer Coyote 10R80 swap
Looking good.
I need to go check out the cross member in mine.
I have a feeling i am going to be persona non grata on the FE forum.... thanks for being a terrible influence. Your work is to a very high standard too, Bravo.
I need to go check out the cross member in mine.
I have a feeling i am going to be persona non grata on the FE forum.... thanks for being a terrible influence. Your work is to a very high standard too, Bravo.
Robert
1972 F100 Ranger XLT (445/C6/9” 3.50 Truetrac)
"An unarmed man can only flee from evil, and evil is not overcome by fleeing from it." -- Jeff Cooper
1972 F100 Ranger XLT (445/C6/9” 3.50 Truetrac)
"An unarmed man can only flee from evil, and evil is not overcome by fleeing from it." -- Jeff Cooper
-
Venomous duck
- Preferred User
- Posts: 268
- Joined: Fri Jun 22, 2018 6:39 am
- Location: Norman, Oklahoma
- Contact:
Re: PaPa's 69 F100 Explorer Coyote 10R80 swap
Thanks for the compliment. Part of me is always going to miss the FE, especially the low end torque. The Coyote is very unfamiliar to me, however with deep skirted block and cross-bolted mains I keep telling myself it is a modern FE. I hope I will be happy with the end product.
-
Venomous duck
- Preferred User
- Posts: 268
- Joined: Fri Jun 22, 2018 6:39 am
- Location: Norman, Oklahoma
- Contact:
Re: PaPa's 69 F100 Explorer Coyote 10R80 swap
Here are the two harnesses that come with the kit.
You do not have the required permissions to view the files attached to this post.
-
Venomous duck
- Preferred User
- Posts: 268
- Joined: Fri Jun 22, 2018 6:39 am
- Location: Norman, Oklahoma
- Contact:
Re: PaPa's 69 F100 Explorer Coyote 10R80 swap
There is not much more to show on the wiring. I can't really do much more until I get the cab on so I moved on to the radiator core support. My support had some rust in it that I thought I could cut out and repair but it was too far gone. I looked around and found several available and the prices vary quite a bit. Because of the size it has to be shipped by truck so the freight is also a major expense. I was worried about a repop core support but I really did not have a choice. I am pretty sure that most if not all of these are made by the same factory in Taiwan. Every time I found a picture of one it was in the same box marked with the APEX logo. I bought mine from Ebay marked as a Goodmark brand, it was sourced from Keystone. So if you are needing one of these check with LKQ, they own Keystone and it may save you on shipping if you buy from them, maybe. I was surprised at the quality of the piece. All the holes seem to be in the correct spot, all the measurements are spot on. I found two problems. First was I noticed it rattled when I bumped it against something. Turns out all of the spot welds on one side did not weld together. I just drilled them out and welded it back. The second problem is that where the brace goes to the center bottom had the hole just a little off. Overall it turned out pretty good.
You do not have the required permissions to view the files attached to this post.
-
Venomous duck
- Preferred User
- Posts: 268
- Joined: Fri Jun 22, 2018 6:39 am
- Location: Norman, Oklahoma
- Contact:
Re: PaPa's 69 F100 Explorer Coyote 10R80 swap
Here are some comparison pics.
You do not have the required permissions to view the files attached to this post.
-
Venomous duck
- Preferred User
- Posts: 268
- Joined: Fri Jun 22, 2018 6:39 am
- Location: Norman, Oklahoma
- Contact:
Re: PaPa's 69 F100 Explorer Coyote 10R80 swap
Of course I had to powder coat the support.
You do not have the required permissions to view the files attached to this post.