|


|

|
Page 03 - Disassembly of the Parts Trucks |
|
 |
|


Here's a
shot of the '77 XLT 4WD donor truck, which gave up the rust-free radiator
support and galvanized inner fender aprons.
A front
shot of the '77 F-150 donor truck prior to disassembly |
July 4-6, 2003 - I spent my 3-day holiday weekend stripping
parts...in 100-degree (plus) temperatures. The shot above shows me
removing the front clip off the '70 F-100 parts truck. If you
remember from the last page, this truck has the cab and fenders I'll
be using for my '67, but the radiator support and inner fender
aprons are too rusty to use. Did some research online and found that by simply drilling a couple of
additional holes, I could use the radiator support from a '73-'79
donor...and since Ray had several of those trucks laying around next
to this '70, which he didn't need either, I was given the go-ahead
to pull a radiator support and fenderwells from a '77 F-150.
Now the radiator support (and
especially the fender aprons) are different in appearance, so they
wouldn't be correct for a show truck, but for a daily driver or even
an occasional show-and-shine, they'll work fine, look good and few
would ever notice the difference.
|

Ah...just what the doctor ordered: one dent-free rust-free radiator
support...plus, the price was right!

Just
about finished stripping it down. |

|

Here you can see that the fender mounting points at the top of
each radiator support is identical. On the left is a '70, on the
right is the '77. |

 |
I
was unable to find a useable '67-'72 radiator support, but had
access to and found that the '73-79 unit can be used. Here is the
side-by-side comparison. The frame mounting points are the same,
but the '73-'79 piece has a few additional holes and also has
provisions for mounting the air-conditioning condenser. The hood
latch area requires drilling one hole to mount the latch. |
|

The fender mounting points along the sides of each of the radiator
supports is also the same. The '70 is in back, the '77 in front. |

Here
are the passenger-side aprons, with the newer galvanized unit on
bottom. You can see the differences towards the rear of the newer
unit to accommodate a firewall-mounted air-conditioning unit.
While it will look different on your '67-'72, it will fit and
function just fine. |

In
this shot you can see the additional mounting points on the
'73-'79 piece (on bottom) for the air-conditioning condenser. |
|

In
this side-by-side comparison of the fender aprons, you can see the
later model hood hinges bolted to the opposite side of the apron's
support rib. However, the attachment points on the hood are very
similar...close enough to use. (The picture is mis-labled as a '69
piece...it's supposed to say '70.) If using the newer fender
aprons, you must also use the newer hinges. |

One
additional hole will need to be drilled in the '73-'79 fender
apron if used with your current radiator support. Use your old
apron as a
template for drilling. |

Here we see the differences in the hood latch areas of the two
radiator supports. The '70 version is on top. One hole will have to be drilled to
use the older-style hood latch. You can just use a bolt and nut
here, but to allow some room to make latch adjustments, it's
better to use a J-nut similar to the existing hole, using your old apron
as a drilling template. Both fender aprons will need this hole
drilled in the appropriate spot. |
 |
The driver-side fender aprons are a bit closer in appearance.
You can readily see the different attachment points for the
hood hinges. The hinges attach to the hood with 'adjustable'
J-nuts. The adjustable range on the '67-'72 hoods is app.
62-1/4" to 63" and the range on the '73-'79 hoods is app.
61-1/2" to 61-3/4".
After sliding the J-nuts as close to the '67-'72 hood
centerline as possible, there is only 1/2" difference...or
1/4" each side. If you've ever wiggled your hood hinges
with the hood removed, you'll know they can move back and
forth as much as several inches, so the 1/2" difference is
nothing to be concerned about. The hinge can easily be flexed
the 1/4" to mount up and work with no difference in appearance
or function.
|
|
|

The Removal
of the Cab |
|

With the top of the door frames being as flat as they are, it was
an easy task to insert a long plank through the open windows to
lift the cab off the frame without damaging the cab. |

That's Ray running the loader. Whoops...forgot to disconnect the
emergency brake cable! Ray had inserted new cab corners several
years earlier with the intention of welding them in later, but
didn't quite get around to it...which is why you see it hanging
down here. |

After the cab was removed and set aside, the engine/tranny was
removed and set aside indoors, and then I salvaged various other
small parts. The tailgate was saved as was the engine's
small-block V8 frame mounts. |
|

We dragged the trailer holding the '68 up to the shop area for
last-minute parts removal. The Dana 60 posi unit was salvaged,
along with the rear springs, the engine's big-block frame mounts,
power brake master cylinder & booster, and numerous small interior
parts. |

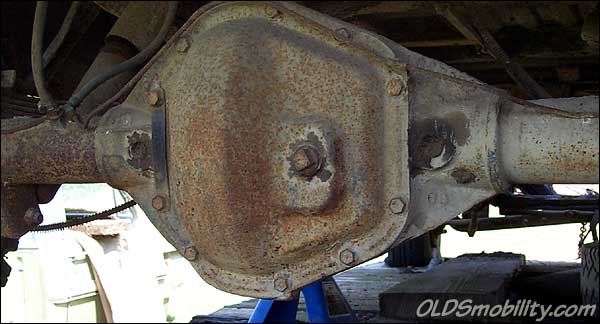
The
Dana 60 posi unit was removed along with the rear springs and are
destined for the back-end of my '67. Since this was original
behind a 390, it'll more than handle the I6 or even the V8 that I
might throw at it later on. |

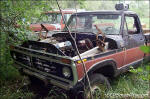
Almost a sad ending to the '70. Ray decided to make his box
trailer out of the remains of this '70 instead of using the red
'68. The shell of the '68 was immediately hauled off to the scrap
dealer and the '70 was towed up to a corner of the field, awaiting
it's next incarnation. |
|
 |

Want to link to
this site? Please save this banner to your hard drive to place on your
webpage.
The correct link to use is
http://www.fordification.com
|