|


|

 |
|
Saturday, October 08, 2005 - Sorry about the
delay in posting an update....it's been pretty hectic around
here lately, so I haven't had as much time to get anything done
at the shop. |
|

CLICK TO ENLARGE |
The big news is that 4 days ago, on October 4th at 12:16 AM, my
wife Mary and I welcomed home a new little baby girl!!! (Her
birthday will be easy to remember...since it's 10-4!) We named
her Brianna Nicole, and she weighed 6 lbs. 15 oz. and was 20"
long.
Everybody's healthy and happy and doing well here at home. It's
obviously a bit of adjustment for our 3-year-old and 1-year-old
boys, though I have to admit they're taking it easier than I
thought they would.
I'll be posting a picture page within the next day or two and
will update this page when this is done. |
|
Anyway, I HAVE been getting in a little time here and there
throughout the month of September, there just wasn't enough done
each time to warrant a project update. However, I'll get you
caught up with everything that I've been up to over the past
month...but be prepared, this is a large page: |
|

Fig. 1 - I finally got the interior cab floors coated with
POR-15 and then several coats of paint.

Fig. 2 - Here's a close-up of the freshly painted floorpans.
You can see where the floorpans did have a little pitting in
them, and if it wasn't for them, this floor might just be to
purty to cover up with carpeting! |
September 8, 2005 - It was a slow day at work, like it
always is on Thursdays, so I left work a little early and headed
to the shop, so I could get the cab floors done. It actually
didn't take me too long....about 2-3 hours from start to finish,
and that included getting several coats of Krylon on top of the
POR-15 (Fig. 1). At first I wasn't going to worry about the
topcoat, but I got to thinking about how they say nothing will
stick to POR-15 once it's dry, and I intend to use some
sound-proofing material, like DynaMat....so I needed to be able
to stick it down with adhesive. So the topcoat was applied
simply to give the sound-proofing material something to bite
into.
As I was taking these pictures this afternoon, it
suddenly dawned on me that I'm about to the point where I really
need to paint the cab. I really can't begin any further cab
assembly until then! So...I guess over the next few days I'm
going to have to sit down and start going through my picture
collection and definitely decide on a color. As mentioned
earlier, I'm kinda leaning towards Rangoon Red, although since
this truck is mainly being built as a hauler for the 442, which
is going to be midnight blue, I'm toying around with the idea of
painting the truck the same color. I could do midnight blue with
some silver accents, which I think would look really sharp. |
| |
|
|
September 25, 2005 - I spent most of the day in the shop
getting a lot of little items cleaned up, sandblasted and
painted. I concentrated on things which needed to be mounted in
the engine compartment. Actually, MOST of the day was spent on
nuts and bolts. I had cardboard boxes spread out all over the
shop with holes poked in them and freshly-painted bolts sticking
out. In fact, there were so many now that I had to start
labeling each box, just so I'd know what the bolts sticking out
of each box were for. I also sandblasted and painted the power
booster and brackets, the underdash brake pedal assembly, the
horns, the windshield washer nozzles, jack hold-down
bracket...and that's in addition to nearly a hundred nuts,
bolts, washers, clips, etc.
I'm keeping my fingers crossed that this junkyard booster is OK,
since I didn't check it first. That's why I removed the mounting
brackets and painted them separately. That way, if the booster
IS bad and needs replaced, I won't have to repaint the brackets.
Anyway, as you can probably start to see, my aim is to make
almost everything under the hood black...except the engine.
Black will make everything in the 'background' blend in and be
unnoticeable...and by contrast the chromed and detailed engine
will REALLY stand out in the engine bay. |

Fig. 3 - I separated the booster and brackets for painting,
in case I needed to replace the booster.
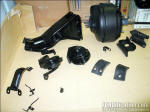
Fig. 4 - I accidentally grabbed a can of Semi-Gloss paint
instead of Semi-Flat when I painted everything but the
booster/brackets, so they got another coat of the correct paint. |
| |
|

Fig. 5 - Here's the booster and new master cylinder mounted.
I probably should have cleaned up the engine compartment before
snapping this picture....you can see a lot of water spots from
the last time I rinsed off the truck in the driveway.

Fig. 6 - Another view of the MC and booster. I then spent
the rest of the afternoon working on the engine compartment
wiring. |
October 1, 2005 - I puttered around the shop all day today,
mainly getting some much-needed cleanup done. It was starting to
get pretty crowded, so I hauled a lot of parts up to the storage
room above the office just to get them off the shop floor. I
spent a little time mounting a new bench vice I bought
yesterday...a nice large vise to replace the small one I've been
using up to now. I also finished stripping down the '67 F250
chassis, because I wanted to save the rear springs and rearend,
and the front springs, which were brand new when I got the
truck...hadn't even had the weight of an engine put to them yet.
Once it was down to the bare frame and front suspension (minus
the front springs), I was able to lift the back end of the frame
and pull it around to the back of the shop. Then I spent some
time removing the springs from the rearend, and then got the
rearend off into a corner of the shop.
I then spent some more time installing some of the
freshly-painted engine compartment components from last weekend
(Fig. 4). Got the brake pedal assembly mounted and then got the
power booster and new master cylinder bolted up. I also got the
horns and battery tray mounted.
Anyway, I then spent the rest of the afternoon working on the
engine compartment wiring. There was a few wires which needed
repairs, and then I spent some time installing the black plastic
wire loom on the wiring harnesses. I had to use my Dremel tool
to sand off a few small areas of the freshly-painted surfaces
for wiring ground wires, to ensure a good clean contact. |
| |
|
|
October 8, 2005 - On today's agenda was welding...or as
close as what you can call the burning/melting of metal that I
do with the MIG...I'm not entirely sure you can actually call it
welding.
The previous owner had installed a snap-on boot between the rear
cab window and the camper window, and since I doubted I'd ever
use them, I decided to go ahead and remove the snaps and get the
holes welded up. I also needed to get the fuel tank filler neck
hole welded up, since I won't be using an in-cab fuel tank.
There were also holes along both sides of the cowl panel, where
camper support brackets had been mounted, which needed to be
welded up. |

Fig. 7 - Here's a view of the snaps around the rear window
which needed removed and the holes filled. |
|
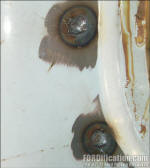
Fig. 8 - Here's an example of my poor welding
skills...effective, but not very pretty. It was very tricky
trying to avoid burning through the metal. |

Fig. 9 - However, they did look a lot better once they
were ground down. A paper-thin layer of body filler will smooth
these right out. |

Fig. 10 - Here's a shot taken after all the welding and
grinding was done. It actually doesn't look too bad I guess, but
I DO intend to keep practicing my welding. You can also see that
the previous owner had a gun rack installed, so those holes had
to be welded up as well. I'll be installing a similar gun rack
but using a different set of holes. |
|
Next on the list was the fuel tank filler hole. I was actually a
little worried about doing this, because I'd attempted it once
before, a few months ago on a different cab, and ended up
cutting it back out because of poor welding. I just had so much
trouble blowing holes in the sheetmetal, even though I had the
amperage on the MIG turned down as far as it would go. I was
hoping I'd do better this time, using what I learned last time.
The one thing I did different this time around was to try
flange-welding instead of butt-welding. That is, instead of
cutting a patch the same size as the hole, I squared the hole
off (so I'd have straight edges) and then used an air-operated
flange/punch tool to put flanges on the patch, thinking that if
there was an overlap I'd be less likely to burn through the
sheetmetal. This time it turned out a little better, but not by
much. I still burned through in several places and had to fill
the holes...not the easiest thing to do with a MIG. After
grinding it down, I decided to use a thin coat of metal epoxy
over the weld as a filler material, prior to applying the actual
body filler. After sanding that down, it doesn't look too bad
(Fig. 12). It definitely looks better from the inside.
However, I gotta tell you that I had to think long and hard
about posting these pictures here. However, I finally decided to
bite the bullet and show you my hack job, embarrassing as it
might be. Hopefully with a little more practice (or a slightly
smaller welder) I'll get a little more proficient at sheet-metal
welding. Fortunately, I believe that this was about all the
sheetmetal welding that I'll need to do.
I then decided that I'd better get the air-conditioning system
mocked up, since I was going to have to drill some holes in the
firewall for the hoses, and this was the time to get it done,
while I had easy access to everything. I was planning on using a
small dealer add-on underdash A/C setup (Fig. 13), but when I
dug it out today, I noticed that there appeared to be a piece or
two missing from the main underdash component. While scrounging
around the storage room looking for them, I started eye-balling
the three factory A/C heater setups I had (Fig. 14). I do have
all the parts for installing one of these behemoths in my truck,
although there are some disadvantages to using one of these. I
actually spent a great deal of time this afternoon weighing the
pros and cons of each different setup, trying to make a
decision, and wasn't able to. Here's some of what was going
through my mind:
|
USING A FACTORY AC/HEATER SETUP |
|
PROS |
CONS |
-
I've got three of these, so I'd have all the
parts needed, plus spares (if needed)
-
Replacement parts should be semi-readily
available
-
Factory appearance
|
-
Lack of passenger-side legroom
-
Lack of glovebox space
-
Would have to install '68-up dash controls,
giving up my unique '67-only cable controls
|
Just so you know, the radio opening in the dash of my '67 has
been butchered by a previous owner (Fig. 15), so I'd have to
make some modifications to mount a radio anyway. I was planning
on just cutting out the perfect radio area from the '68 cab I
have and using that, not only because the radio ears were
still intact, but because the radio opening on the '68-up trucks
is larger. Since I'd want to mount some kind of aftermarket
radio/CD-player in the dash, I'd have to cut the '67 dash out a
little more anyway. But then I got to thinking that if I were to
install the factory A/C setup, I'd also need to install the
special '68-'72 A/C dash controls, meaning I'd also need the
lower part of the '68's dash to mount them. It was then I
decided to just cut the '68 dash out completely and bring it
into the shop. I figured it might be easier (and cleaner) to
replace the entire dash than graft in the middle of the '68'
dash into the '67. I didn't have a spot-weld drill bit to drill
out the welds along the front lip of the dash, where it's
spot-welded to the window frame, so I just decided to drill them
out with a regular bit (Fig. 17), and if I chose to use the
entire dash, I could weld the holes up. Removing the dash from
the '68 took about an hour and it really wasn't that hard. I
learned for future reference that using a spot-weld bit would
definitely have been the way to go, and would have made the job
a lot easier, and the installation would have been much cleaner.
However, after getting the dash removed and setting on the shop
floor (Fig. 16) and doing a lot of thinking, I decided to go
with the original plan of just using the center portion of the
dash. Since I still hadn't decided on whether or not to use the
'68-up A/C controls however, I sectioned out the entire middle
section (Fig. 18), which can be trimmed down in the future if I
decide to use the dealer A/C and keep my '67 heater controls.
I do not intend to try grafting this section into my '67 dash by
welding...I've already learned that I can't weld thin sheetmetal
with my MIG. Therefore, I cut the '68 panel large enough so that
the top edge would be hidden underneath the dashpad, and the
lower lip would wrap around the bottom of the dash, and can be
secured with screws. After painting to match the dash, the edges
would be nearly invisible, and will suit my needs just fine.
Should I decide to keep my '67 heater controls and have to trim
this patch panel however, it'll be a little more obvious, since
the bottom edge of the panel will be visible below the radio,
but I don't think it'll be obvious enough to be unsightly or
annoying.
So this is where I'm at right now. I have to decide for sure
which A/C setup to use, as each requires a different set of
holes in the firewall to route the hoses, plus if I decide on
using the factory setup I'll have to install the whole patch
panel in order to use the dash controls. Decisions,
decisions..... |

Fig. 11 - Here you can see my horrible metal-melting. I
believe the Hobart Handler 175 MIG that I'm using is just too
big a welder for light sheetmetal work, especially for a novice
like myself.

Fig. 12 - It looks a little better after grinding it down
and using a small amount of metal epoxy as a filler, and then
sanding it down. It'll still need a coat (or two) of filler. |
|

Fig. 13 - This is the dealer-installed A/C setup that I was
planning on using.

Fig. 14 - Here's the pile of factory A/C setups I have now.
These could be combined into one good unit, and provide me with
years of spare parts, too.

Fig. 15 - The '67 dash was cut up by a previous owner and
will need repairs.

Fig. 16 - After an hour's worth of work, here's the '68
dash with unmolested radio ears and provisions for the factory
A/C heater controls.

Fig. 17 - You can see the holes along the front lip of
the dash, where I drilled out the spot welds. This dash was
removed from a cab that I completely sandblasted, but decided
against using and set outside, so that's just a little surface
rust you see...nothing to worry about. It'll clean up fine.

Fig. 18 - Here's a shot taken after sectioning out the
middle section of the '68 dash...

Fig. 19 - ...and here's a comparison of the two. The difference
in the size of the radio opening between the '67 (back) and the
'68-'72 (front) is very apparent. |
|
 |

Want to link to
this site? Please save this banner to your hard drive to place on your
webpage.
The correct link to use is
http://www.fordification.com
|


