|


|

Page 08
Painting the Grille...and Working on the Rearend |
|
 |
|
Friday, March 16, 2007 - It was a slow
day at work today, so I took a vacation day in order to spend
some time in the shop working on the choptop. When I started
this project, I had a springtime deadline to have it finished,
but as all things go, I'm running a little behind. I just
haven't been able to spend as much time working on it as I'd
like, and Spring hits us officially next week, so I really need
to get cranking on this project. Let me catch you up on a few
things that's happened since my last update.
I got to spend about 4 hours on this project last Friday after
work, when I got the engine/tranny transferred over to the
choptop (but not bolted down yet) (Fig. 01). Then last Tuesday
evening I got the small-block's engine perches removed from the
donor chassis and bolted into the choptop chassis and got the
motor/tranny completely bolted in solid. Then I got the radiator
support and inner fenderwells mounted (Fig. 02). I was
originally planning on using the front fenders that came with
the truck, but after thoroughly checking them out and finding
them full of body filler, I dug out the spare pair I had that
are almost perfect, with just a couple very minor door dings and
one 1/2" rust hole to repair. I got both of them stripped down
to bare metal front and back, so they're ready for the minor
work necessary.
I then got started stripping down the steel '68 grille that came
with the truck when I bought it. It was a little wavy in spots,
and the previous owner had done some repair welding on it. At
first I was just going to straighten it out a little better and
use it, but after giving it some thought, I've decided to
instead use the perfectly-straight rust-free steel '67 grille,
the one that I was planning on using on the '67. (I've got a
straight '67 aluminum grille that will now be used on that
project.)
So I spent this morning (Friday) stripping the '67 grille down
to bare metal, and then sanded it smooth, gave it several coats
of Rustoleum gray primer (Fig. 03), and then several coats of
Krylon Semi-Flat black (Fig. 04). It wasn't until I was
completely done before it dawned on me that I'd completely
forgotten to strip and sand the headlight doors. However, since
the paint was drying on the grille, I didn't want to created any
dust that might settle on it, so I'll do that in a few days. |
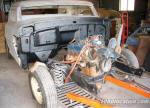
Fig. 01 - On Tuesday evening after work I got
the engine set into the choptop chassis, but not bolted down
yet.

Fig. 02 - On Friday I got the engine and tranny mounted and
the radiator support and inner fenders bolted in.

Fig. 03 - A shot the '67 grille after stripping, sanding and
adding several coats of primer.

Fig. 04 - A view of the finished grille |
|
I was then going to mount the steering box. At first I was just
going to use the box from the '72 donor chassis...which,
interestingly enough, already had a '79 steering box on it. When
I went to pop the Pitman arm loose from the steering linkage, I
had to jerk the wheels a little to the side to give me adequate
clearance for the removal tool. When I did, there was a very
sudden shot of fluid that hit me right upside the head and into
my right ear! When I was cleaning myself up, I noticed that not
only was the fluid brown and burnt-smelling, but it also smelled
more like hydraulic fluid than power steering (or Type F
transmission fluid), so since I didn't want to have any problems
down the road, I decided to just use another box from inventory.
However, it needed to be hit with the power washer, and since it
was too chilly outside to to it today, I just set it aside until
a warmer day.

Fig. 05 - The rear spring's front perch.
|
I'm also planning on using the 9" rearend and the front
suspension from the donor truck. I decided to start on the
rearend. (The donor truck's rearend has the rear brakes and
e-brake cables, which the choptop's rearend was missing).
Knowing I would be removing it, the last few times I've been at
the shop I've hit the U-bolt nuts with PB Blaster to give it
time to soak in and make removing them a little easier. It
worked too...I was able to run them all the way out very easily.
I got the rearend out from under the donor chassis and then
headed back inside to drop the rearend from the choptop...only
to find that the previous owner wasn't really paying attention
when he relocated the front spring perch. He simply cut the
rivets on the perch, slid it up a few inches and welded it onto
the frame...but he didn't flip the spring bolt around first!
With the head of the bolt now up against the frame, there was no
way of removing it (Fig. 05). At first I was thinking I'd have
to cut the perches back off the frame in order to remove the
bolt, but then found that I could get a cutoff wheel between the
spring bushing and the perch, which allowed me to cut the head
off the bolt and pull it out.
I then got the donor truck's rearend inside the shop and slid
under the truck. It was then that I really noticed that although
the donor truck's rearend was complete, the housing was very
rusted and pitted, and would never clean up and look good.
Therefore, I decided to just gut this rearend and put all it's
components into a good rust-free housing. But then I got to
thinking about the front perch for the rear springs. First of
all, I was planning on doing this anyway...however, the previous
owner didn't really move them up far enough. They really should
have been moved up several more inches. Granted, the rearend's
pinion angle would've been off more than it is now, but if
you're gonna do it, then do it right. Therefore, I've decided to
cut the front spring perches off the donor frame and weld them
onto the choptop's frame, but raising them up several more
inches, for more of a drop. Along the lines of "doing it right",
rather than simply using some angled shims to correct the pinion
angle I decided that I really should just cut the springs'
mounting pads off the housing and re-weld them to the housing in
the needed position.
|
|

Fig. 06 - Here's the CS spring pack I'll be
using, after removing some of the leaves.

Fig. 07 - Here's the disassembled spring pack. I
numbered the leaves in this graphic to show which
ones I'll be using and which I'll be discarding.

Fig. 08 - In this shot the difference in leaf
thickness is apparent. An F100 spring is on top and
an F250 CS spring is on the bottom.
|
OK...well, that means I need to get the springs ready to bolt
on. Since I'm also planning on using some lowering shackles in
the back, and since the lowering shackles won't work with the
Flex-o-Matic spring setup that both the choptop and donor truck
had, that meant I had to improvise. The only standard spring
setup I had was from a '67 F250 Camper Special (Fig. 06). This
spring pack has seven leafs, in addition to the thick bottom
overload spring. Since this would obviously be WAY too much for
the choptop, I could eliminate some of the leaves. So I got
started disassembling the first pack (Fig. 07).
After studying
things carefully, I've decided to eliminate 5 of the 8, leaving
me three. While you might think this wouldn't be enough, keep in
mind that the F250 spring leaves are substantially thicker than
the F100 leaves (Fig. 08), so I'm thinking that three of these
thicker F250 leaves will be roughly equal to 4 or 5 of the F100
leaves, which is how many an F100 normally has. Using Fig. 07 as
a guide, you can see that leaf #1 has the pigtails, so obviously
that one has to be used, and leaves #3 and #7 have the
riveted-in spring clamps, one on each end respectively, so those
will be the other two I'll use. I'm going to begin by installing
just these three and see how it goes. I can always replace
another one down the road if it looks like I'll need to. I
considered leaving the #6 leaf in too, but it's really no longer
than the #7, so we'll just see how it goes.
So...I went to
bolt the three leaves back together, when I noticed that the
center leaf-spring bolt which attaches everything together was
now too long, and wasn't threaded down far enough. No problem, I
thought...I'll just grab the bolts from the Flex-o-Matic setup I
just discarded from the choptop's springs. Whoops...they're all
rusted up. No problem, I thought, I'll just grab the pair from
the donor truck's springs. Whoops, those are ALSO rusted out and
unusable. Hmmm...no problem, I thought, I'll just rethread the
existing Camper Special bolts. Well, either it's some REALLY
hard steel, or my 3/8" fine-thread die was already messed
up, 'cause the die barely scratched the surface of the bolt, and
when I looked at the die, the cutting threads were half gone.
(Of course, I only have a cheap tap-and-die set, so it might be
a combination of the two possibilities.) Either way, I'm going
to either get a pair of shorter bolts or get another die.
However, by this time all the parts stores were closed, so that
task will have to wait for another day. However, as I was
getting ready to go home I ran across another 5-leaf
Flex-o-Matic setup in the attic I'd forgotten about with good
bolts, but I ran out of time this evening before I was able to
get them removed...and they might not be threaded down far
enough either anyway...we'll see. |
|
So this
is where I'm sitting at the moment. I've still have a
few minor repairs that need to be completed on the front
fenders and hood before painting. I need to get the
front already-modified spring perches cut off the frame
and discarded, and then remove the perches from the
donor truck and get them mounted. Then I have to get
some shorter leaf-spring bolts, so I can get the spring
leaves bolted together and mounted. Then I can cut the
rearend housing perches off and then loosely bolt the
rearend in place and measure the pinion angle, and
rotate the housing as necessary, tack-weld the perches
in place and then remove the housing to finish welding
them in place....and then reinstall everything for the
final time. And then I get to swap the front
suspension/steering from the donor truck to the choptop.
Lots to
do, so little time. Stay tuned! |
|
|
 |

Want to link to
this site? Please save this banner to your hard drive to place on your
webpage.
The correct link to use is
http://www.fordification.com
|


