|
Sunday, May 27, 2007 - HAPPY MEMORIAL
DAY! I spent the day in the shop today getting some more
bodywork done.
Last week I decided to call up my local John Deere dealership
and had them order two gallons of Blitz Black paint, which is a
low-gloss (flat) implement paint that's super-tough and easy to
apply. It was supposed to be in several days later, but they
forgot to order it, and so it finally arrived today (Fig. 01). I
was turned onto this alternative a while back while researching
flat black paint jobs in
THIS THREAD at HotRodders.com. It's some great reading, and
includes many pictures of other's cars/trucks painted with Blitz
Black, but beware!!...this thread got up to 29 pages before the
moderators decided to lock the thread and condense the entire
thread to a Wiki-like tutorial, located
HERE.
Anyway, I've decided that after the whole truck is completely
reassembled, I'm going to do some light wet-sanding to get
the finish a little smoother and hopefully remove most (if not
ALL) of the vinyl-like texture, and will then hit the whole
truck with several coats of the Blitz Black.
OK, back to today's progress....
Over the past few months, any time I was painting parts with
POR-15 or Eastwood's Rust Encapsulator and had a little left
over, I'd use it up on the bottom of the pickup box so it
wouldn't be wasted, since it can't go back into the can. The
bottom of the box was about 75% covered (Fig. 02), and I wanted
to get it finished up today. It was tricky getting full coverage
up between the box side panels, but I was able to get it done,
alternating between using brushes and a small foam roller (Fig.
03). It's now ready to lay back down so I can do a couple minor
repair welds before setting it back onto the frame, scuffing up
the front box panel and getting it painted, and then I can get
it bolted it down for the final time.
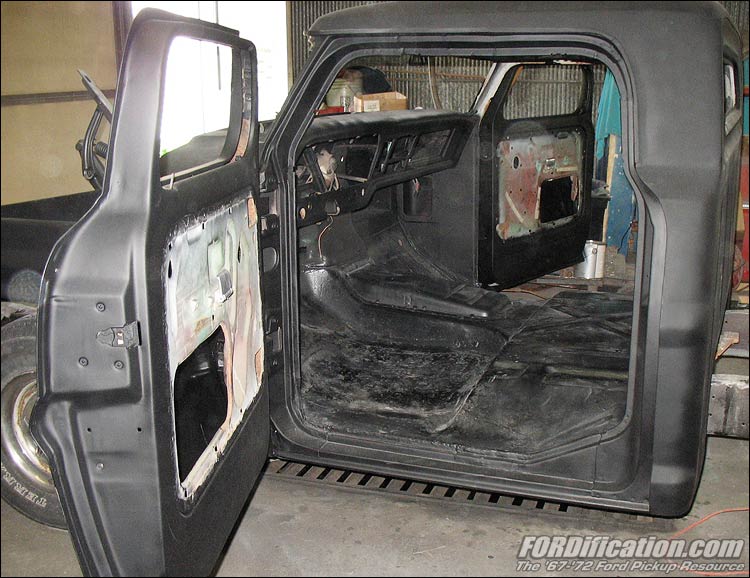
I then turned my attention to the doors and door jambs. I spent
about an hour scuffing the interior sections of the doors and
doorjambs with sandpaper, and then got everything coated with
POR-15, followed up with several coats of Krylon Ultra-Flat
paint. It didn't turn out too bad...though the vinyl-like
texture did appear again, which actually was exactly what I
wanted. Why, you ask? Well, even though I plan to repaint the
truck, I wasn't sure if the wet-sanding I'm planning on doing in
the future would actually get it smooth or just smoother....and
I wanted all panels to match. So even the hood and exterior
portions of the box that haven't been painted yet will still get
painted just like I did before.
I also spent some time wire-brushing the interior sections of
the doors and coated everything inside with POR-15...at least as
much as I could reach. I was mostly concerned with the bottom
six inches or so, where these door typically tend to rust out,
but as long as I was in there I went ahead and painted
everything I could get a brush to.
I then got started on the main dash area. I wasn't intending to
use POR-15 there, I was just going to scuff it up for paint.
Figs. 05 and 06 show the painted doorjambs and dash. I went
ahead and used the Flat Black on the dash, although I was
debating on whether to use a Semi-Gloss on that instead just for
appearance sake...but in the end I decided to give the dash the
same matte finish as the exterior. I also used up one can just
hitting the underdash area, though I really don't know why.
Since the interior firewall was going to be complete covered up
with the firewall cover (or at least not visible without looking
up under the dash), painting it wasn't really needed, but I did
anyway.
Well, that was the extent of the day's activities. My next day
in the shop will be setting the bed down onto the floor so I can
do the welding repairs and I'll then be painting the box's front
panel so I can get it bolted down permanently.
Once the box is bolted down, I'm not sure which route I'll take
as for the project's next step. I'm kinda thinking I'd like to
get started getting the windshield cut and installed, so I'm
probably going to end up burning at least a full day practicing
cutting glass with my new water-cooled tile saw, purchased
specifically for this task. For those of you who don't recall, I
bought the saw after reading about how others on the H.A.M.B
messageboard have used this method for cutting windshields for
choptop projects. If you're interested, read these two threads:
[
THREAD 01 ] - [
THREAD 02 ]
|
Well,
that's it for now! Stay tuned, as I'm sure things will start
going together a little quicker now that a majority of the
bodywork is done. I also really need to get busy with the engine
and transmission, completely the clean-up and installation of
these. |
|
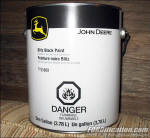
Fig. 01 - Here's a shot of the John Deere Blitz Black paint
that will eventually be used on the choptop.

Fig. 02 - Here's the progress I'd made on the bed floor
over the past few months with leftover POR-15 and Eastwood's
Rust Encapsulator.

Fig. 03 - The finished bed floor. The top 1/3 is Eastwood
Rust Encapsulator (which is a semi-gloss), the bottom 2/3 is
gloss POR-15.
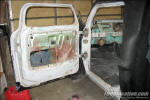
Fig. 04 - Here's a shot of the inside door areas and the
doorjambs scuffed and ready to paint.

Fig. 05 - After applying the POR-15 but before the paint
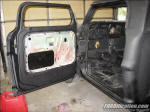
Fig. 06 - And here's the finished job, after several
coats of black paint. In this shot you can also see the
freshly-painted dash area.

Fig. 07 - You can see how the interior is basically ready
to be reassembled. |