|


|

|
|
|
Fuel
Tank Sending Unit Tech |
|
|
 |
|
Whether you're
troubleshooting your truck's fuel system to find out why the fuel gauge
isn't working (or not working accurately) or simply need to know how to
check a junkyard part, knowing what to do can save you a lot of
headaches and money in the long run. On this page I hope to give you the
information you need to know to make an accurate diagnosis of your
parts. I'm only going to be covering factory setups on this page,
however, since the vast array of aftermarket auxiliary fuel tank setups
would obviously make this tutorial an impossible task.
FYI: The most common
fuel tank used in the '67-'72 era of Ford trucks is the in-cab tank.
The standard version holds 19 gallons, those equipped with evap. controls hold 18.5 gallons,
and a
21.5-gallon version was also available.
|

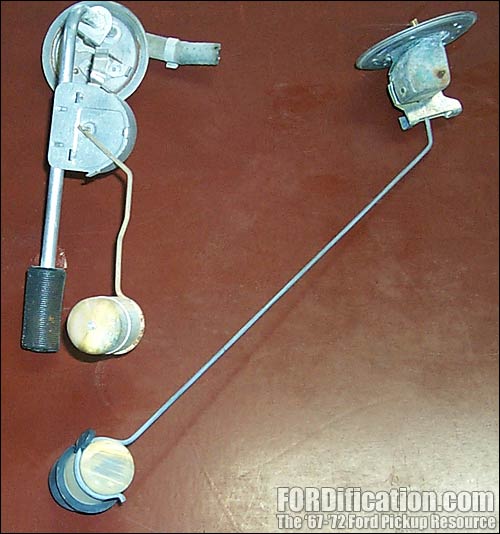
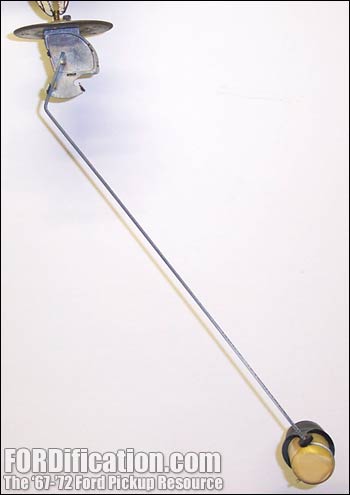
Fig. 1 - These are the
two most common sending units you'll run across. On the left is the
25-gallon factory in-frame fuel tank sending unit. On the right is the standard
19-gallon in-cab fuel tank sending unit. |
THE BASICS

|
|
Even though it probably doesn't seem like it to someone who's
having problems with their fuel level gauge, these are actually
very simply electrical devices. Understanding how they work
makes it much easier to diagnose problems. Here's how the fuel
gauge works:
The fuel gage circuit consists of the sending
unit in the fuel tank, the gauge in the dash, and
the wiring and dash wiring (or circuit board) between them. As with most sensors, the
tank sending unit is simply a variable resistor. Its function is to resist the flow
of
current from the ground to the gauge depending on the position of the float
within the tank. The higher the fuel level, the higher the float raises, which
decreases the resistance between gauge and ground. The more current that flows
through the meter, the higher the gauge needle moves. |

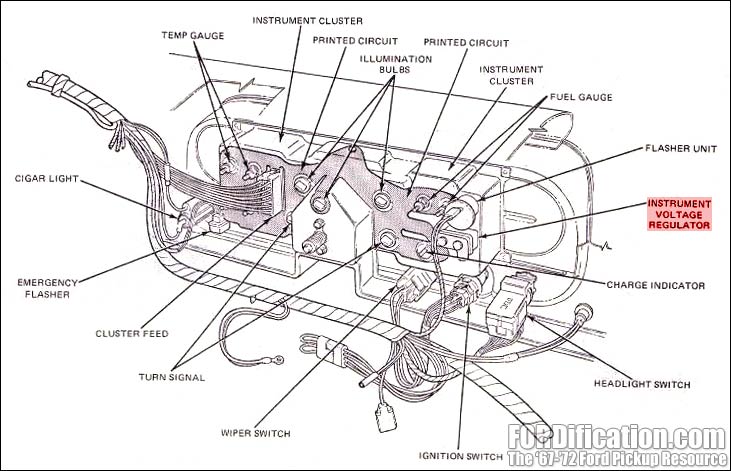
Fig. 5 |
The sending unit operates off a 5-volt pulse supplied by the
instrument panel voltage regulator (IPVR, Fig. 5), so just
running a 12V hot wire to the unit won't work, and in fact will
fry the sending unit. See Fig. 6 for the typical
location on the backside of the instrument panel. |
|


Fig. 6 |
|
|

Fig. 7 - '67-'69 vs. '70-'72 style
regulator. The later style was for use with a printed circuit
board. (click to enlarge) |
You can test the IPVR without pulling the instrument cluster.
Tilt the seat forward and pull off the orange wire from the fuel
tank sending unit. When you probe the connector, your test light
should flash on and off. You can also do the same test under the
hood. Pull off the sender wire from the temperature sender
and/or the oil pressure sender and probe those connectors...they
should flash too. |
TROUBLESHOOTING
|
 PROBLEM:
The fuel gauge does not work at all...no needle movement.
PROBLEM:
The fuel gauge does not work at all...no needle movement.
With the
ignition switch on, remove the wire from the fuel tank sending unit
and ground it to the unit housing. This removes the resistance
supplied by the sending unit, and should cause the gauge to swing
over to the 'Full' position. Does this happen? |
|
|
|
|
The
gauge and wiring are good. The problem is most likely with the sending unit. The
sending unit must be removed for further testing.
(1) |
Ground
the sending unit wiring to a good chassis ground (instead of the
sending unit housing) and watch the gauge. Does it now peg out to
the 'Full' side? |
| |
|
|
|
|
|
The
problem is with the sending unit ground. Either the unit itself is
bad or the float/arm is binding/missing. The sending unit must be
removed for further testing. |
The
power supply to the gauge has been interrupted, (check fuses), the
gauge is defective, or the wire from the gauge to the sending unit
is open or has a break in it. |
|
Testing
the Sending Unit |
|
|
After
the sending unit has been removed from the tank, check to make sure
the float is present, intact and still floats and that there
is no binding with the float arm. Reconnect the gauge wiring to the
unit and ground the unit. Move the float arm up and down. If the
gauge reads full in the full up position and empty in the full down
position, then the sending unit is good. Verify by hooking up an
ohmmeter to it and making sure it reads 8-12 ohms full and
70-73 ohms empty. If not, the sending unit needs repaired or
replaced. You can easily disassemble the head of the sending unit to
clean and/or repair...see the photos below. |
TROUBLESHOOTING NOTES
(1)
If you have dual tanks and a non-operative or sporadic fuel gauge,
and grounding the sending unit wire on each tank pegs the gauge, you
probably don't have problems with both sending units. Take a look at
your fuel tank selector switch as a culprit. Test the switch for
continuity. You might find you'll need to carefully disassemble and
clean the switch internally and lubricate it with dielectric
grease.
|

Fig.
8 |
|
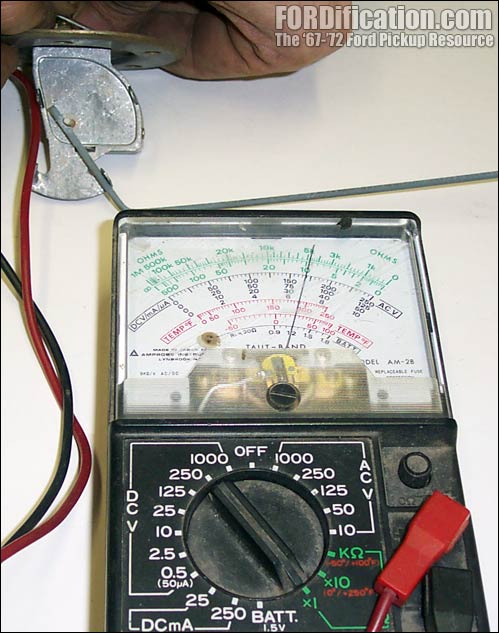
For educational purposes I hooked this sending unit
up to both a digital and an analog ohmmeter to
compare the readings. Both gave similar readings and
verified that it was reading within normal
parameters.
NOTE: You MUST make sure your ohmmeter is capable of
reading the range needed...many inexpensive
hardware-store variety units are not designed to
measure that fine a range. My little analog ohmmeter
only had one range for reading resistance, which was
1-1000Ω. This scale is MUCH too great for
reading the slight variations needed here, and
didn't even result in the meter's needle moving at
all. You need a tester having a 1-100Ω or 1-200Ω
range. Having the right equipment makes all the
difference! |
|

Fig.
9 |

Fig.
10 |

Fig.
11 |
|
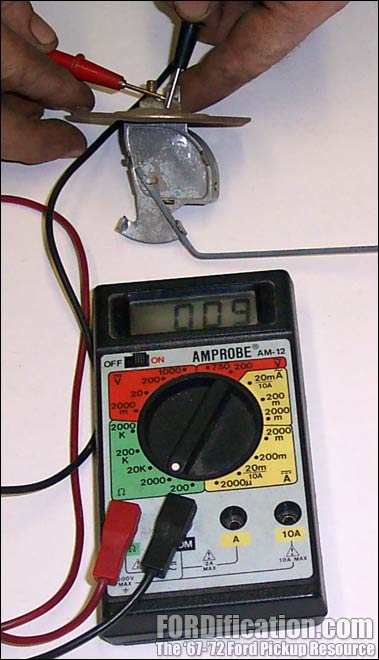
Measuring the resistance in the 'Full' position of the
float gave readings between 9-11 ohms. |
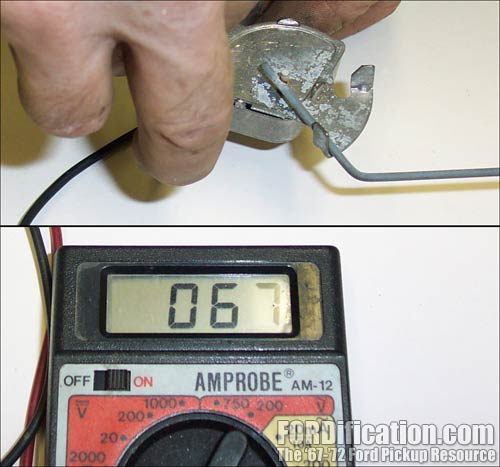
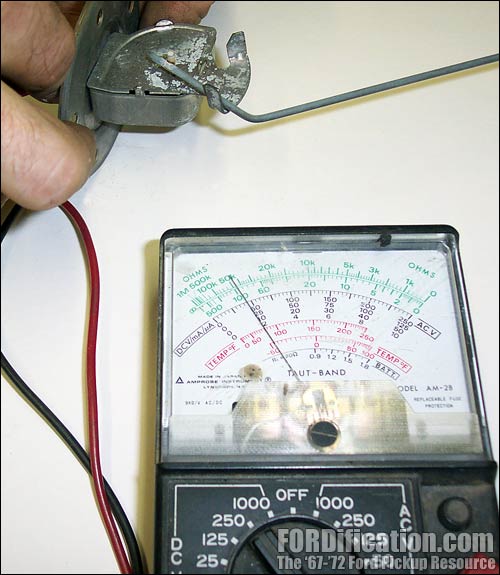
Measuring the
resistance in the 'Empty' position of the float gave readings
between 67-70 ohms. |
|
As
mentioned above, a fuel tank sending unit is nothing more than a variable
resistor, and the fuel gauge is simply measuring the resistance
between the hot wire and the ground.
The fuel tank sending units used on all Ford products up through
1986 have a resistance range of approximately 8-12 ohms full and
70-73 ohms empty. (I tested my factory 25-gallon in-frame
auxiliary tank's sending unit, however, and got readings of 20Ω
full and 85Ω empty.) |
|

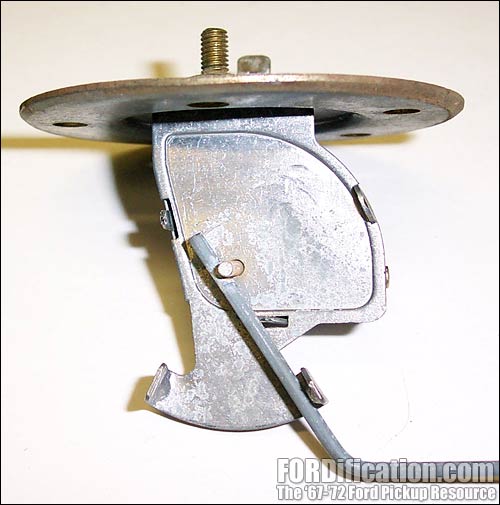
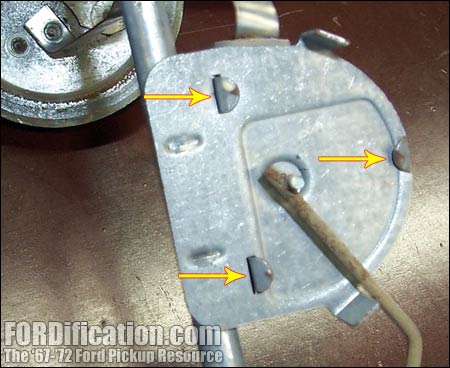
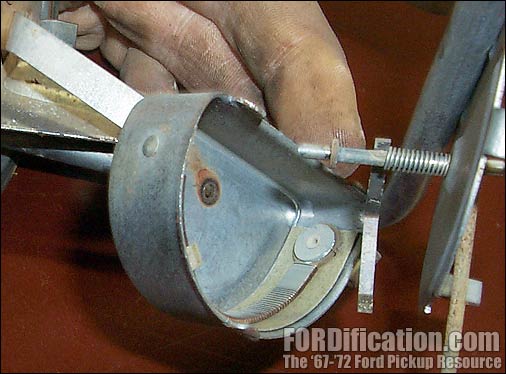
Fig. 5 - To open the head, simply
straighten out these metal tabs holding the unit closed and
gently pull the two halves apart. |

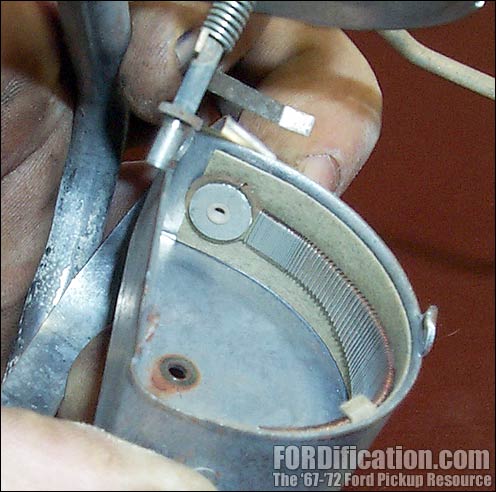
Fig. 6 - Once the unit is opened
up, you'll see the thin wrapped wire which make up the resistor.
The thin metal wipe glides along the wrapped wires, and the
resistance is measured between the end of the resistor and the
end of the metal tang. |

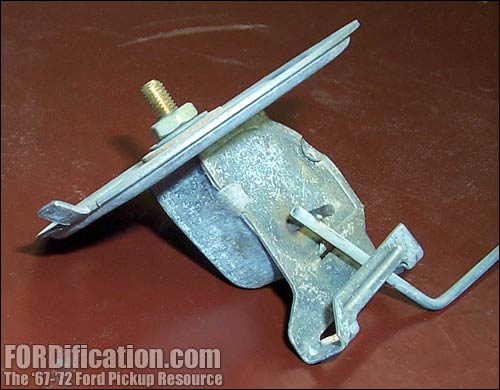
Fig. 7 - Here's another view of the
exposed resistor, with a better angle showing the metal wipe
inside. This wipe can be carefully bent, if needed, to make
better contact with the wound resistor wire. Occasionally the
wipe has fallen off the shaft and can be soldered back on. You
can also gently clean the internals with fine steel wool, but be
VERY careful not to break any of the wires. |
| |
|
If you're unable to find an exact factory-style replacement sending unit
(or unwilling to pay the prices they're getting these days), there's
another option. You can simply go to your auto parts store and tell them you need a
sending unit to work with those resistance readings mentioned above.
If you can only get one which similar resistance values but not exact, you can
usually bend the float rod and/or the
tangs on the sender body to alter the resistance to suit. Most sending units
have universal flanges that will work in any tank unless it is home
made.
If you're going an aftermarket gauge, depending on who you get it
from, you might have to use their sending unit. Most aftermarket gauges are
not for use with a factory Ford sending unit. However,
Autometer does have special gauges which work with the factory
sending unit. From the Autometer website:
|
http://www.autometer.com/tech_faq_answer.aspx?sid=1&qid=56
 The
short sweep electric fuel gauge manufactured by Auto
Meter for the Ford 73-10ohm range is calibrated for the
original Ford factory supplied, non-linear, fuel level
sender design. If you view the gauge dial itself, you
will notice that the halfway point in the gauge is in
fact not centered in the field in order for the
calibration to match this special sender. The
short sweep electric fuel gauge manufactured by Auto
Meter for the Ford 73-10ohm range is calibrated for the
original Ford factory supplied, non-linear, fuel level
sender design. If you view the gauge dial itself, you
will notice that the halfway point in the gauge is in
fact not centered in the field in order for the
calibration to match this special sender.
The Ford Fuel Level sensor with a 73-10ohm range
operates with the following ohm ranges for Full, Half,
Empty, and Below Empty:
Full: 10ohms
Half Tank: 25ohms
Empty: 50ohms
Pointer Width Below E: 73ohms
If you have replaced the original equipment Ford sending
unit in your vehicle with an aftermarket sending unit,
you may notice that the gauge will match the sending
unit at the Full and Empty portions of the scale, but
that the readings in between will not match up. The
reason for this is that some aftermarket senders
operating with the 73-10ohm range now utilize a linear
movement instead of the original non-linear scale. The
comparative ohm reading difference for Full, Half, and
Empty have been supplied below for your reference.
Full: 10ohms
Half Tank: 41ohms
Empty: 73ohms
As you can see these numbers differ radically from those
of the factory Ford sending units and have a drastic
effect upon the gauge readings.
In the event that you have this situation, we recommend
one of two options. The first would be to seek an
original equipment fuel level sending unit from Ford
directly for your vehicle. The other would be to
purchase one of our 240-33ohm scaled gauges and the
matching #3262 sending unit, or if this unit will not
fit your specific tank type, a similar 240-33ohm fuel
level sending unit from your tank manufacturer. We
recommend the 240-33ohm units because they are a broad
linear scale and provide a very accurate reading of the
fuel level in the tank. |
Ohms/Resistance
(Empty/Full) |
Popular Models |
| 0-90 Ohms |
most GM cars, 1965-up |
| 73-10 Ohms |
pre-1989 Fords & most Chryslers |
| 240-33.5 Ohms |
Industry standard, works on many
popular cars |
| 0-30 Ohms |
most pre-1965 GM cars |
| 16-158 Ohms |
most '89-up Fords |
|
|
|
 |

Want to link to
this site? Please save this banner to your hard drive to place on your
webpage.
The correct link to use is
http://www.fordification.com
|